Run Ubuntu distro
Official OS on Raspberry Pi is a Debian distro which is lightweight and more stable but slowly updated. Running Ubuntu on Raspberry Pi gives user a richer user experience and up-to-date software. Moreover, Ubuntu is the main OS that ROS natively supports.
Last update: 2022-05-07
Table of Content
Ubuntu#
Ubuntu Desktop comes with a rich desktop environment which consumes a bit high system resource and performance. Therefore, other lightweight version of Ubuntu will be chosen.
In December 2019, Canonical published a support roadmap for the latest Raspberry Pi 4 single-board computer on their Ubuntu Server operating system and pledged to fully support Ubuntu on all Raspberry Pi boards.
Ubuntu for Pi currently supports Raspberry Pi 2, Raspberry Pi 3, and Raspberry Pi 4 models, and images are available for the latest version of Ubuntu LTS.
Old-releases archived images
Visit https://old-releases.ubuntu.com/releases/ to see the full list of prebuilt images for older versions.
Supported boards#
Ubuntu supports :
- Raspberry Pi 2
- Raspberry Pi 3
- Raspberry Pi 4
- Raspberry Pi 400
- Raspberry Pi CM4
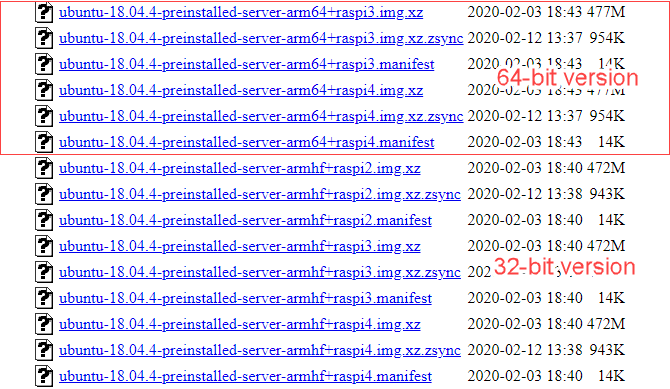
All boards have 2 version: 64-bit and 32-bit, except Raspberry Pi 2 which has only 32-bit version.
64-bit version
This version is built for 64-bit mode of the CPU used in Raspberry Pi boards. It has arm64 tag in the image name.
32-bit version
This version is built for 32-bit mode of the CPU used in Raspberry Pi boards. It has armhf tag in the image name.
Flash image to a microSD Card#
Follow the instruction of using Etcher to flash the image.
Launch Etcher and select the image file and the target SD card. The process will take a few minutes, so be patient. When Etcher is done, follow the headless mode setup if needed as the installed Ubuntu version is for server.
SSH
Create an empty file ssh at the root folder of the boot partition of the SD Card.
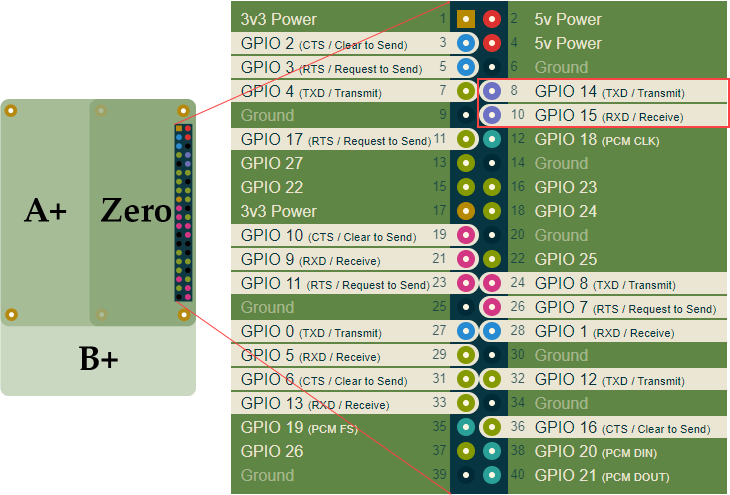
UART Console
By default, Ubuntu image enables the primary mini UART port, and also enables the Linux system console on that port. Connect a USB to TTL serial converter to GPIO 14 (PIN8) and GPIO 15 (PIN 10) to access the UART port.
Boot up
Login with the default user:
- Login:
ubuntu - Password:
ubuntu
Right after the first time logging in, default password have to be changed.
Wi-Fi setup#
Starting from Ubuntu 18.04 LTS, Ubuntu uses Netplan to configure network interfaces by default. Netplan is a utility for configuring network interfaces on Linux. Netplan uses YAML files for configuring network interfaces. YAML configuration file format is really simple. It has clear and easy to understand syntax.
Edit the Netplan YAML configuration file /etc/netplan/50-cloud-init.yaml with the following command:
sudo nano /etc/netplan/50-cloud-init.yaml
Add the Wi-Fi access information. Make sure not to use tab for space, use the spaces to create the blank.
# This file is generated from information provided by
# the datasource.  Changes to it will not persist across an instance.
# To disable cloud-init's network configuration capabilities, write a file
# /etc/cloud/cloud.cfg.d/99-disable-network-config.cfg with the following:
# network: {config: disabled}
network:
    version: 2
    ethernets:
        eth0:
            optional: true
            dhcp4: true
    # add wifi setup information here ...
    wifis:
        wlan0:
            optional: true
            access-points:
                "YOUR-SSID-NAME":
                    password: "NETWORK-PASSWORD"
            dhcp4: true
Change the SSID-NAME and the NETWORK-PASSWORD with the Wi-Fi AP information. Close and save the file using Ctrl+X and press yes.
Now, check whether there’s any error in the configuration file with the following command:
sudo netplan --debug try
If any error encounters then check with this command for detailed error information:
sudo netplan --debug generate
Apply the configuration file with the following command:
sudo netplan --debug apply
Setup priority#
By default, Ethernet has higher priority to route network packets through it.
Run:
route -n
This will show the metric value for eth0 is 100 and that value of wlan0 is 600. Lower value has higher priority.
Destination     Gateway         Genmask         Flags Metric Ref    Use Iface
0.0.0.0         192.168.0.1     0.0.0.0         UG    100    0        0 eth0
0.0.0.0         192.168.1.1     0.0.0.0         UG    600    0        0 wlan0
192.168.0.0     0.0.0.0         255.255.255.0   U     0      0        0 eth0
192.168.0.1     0.0.0.0         255.255.255.255 UH    100    0        0 eth0
192.168.1.0     0.0.0.0         255.255.255.0   U     0      0        0 wlan0
192.168.1.1     0.0.0.0         255.255.255.255 UH    600    0        0 wlan0
To make Wi-Fi has higher priority, add a config line in Netplan configuration file:
sudo nano /etc/netplan/50-cloud-init.yaml
wifis:
    wlan0:
        access-points:
            "SSID":
                password: "pasword"
        dhcp4: true
        dhcp4-overrides:
            route-metric: 50
        optional: true
Then regenerate network configs and apply them:
sudo netplan --debug generate && \
sudo netplan --debug apply
Run again:
route -n
to see the metric for wlan0 is now set to 50:
Kernel IP routing table
Destination     Gateway         Genmask         Flags Metric Ref    Use Iface
0.0.0.0         192.168.1.1     0.0.0.0         UG    50     0        0 wlan0
0.0.0.0         192.168.0.1     0.0.0.0         UG    100    0        0 eth0
192.168.0.0     0.0.0.0         255.255.255.0   U     0      0        0 eth0
192.168.0.1     0.0.0.0         255.255.255.255 UH    100    0        0 eth0
192.168.1.0     0.0.0.0         255.255.255.0   U     0      0        0 wlan0
192.168.1.1     0.0.0.0         255.255.255.255 UH    50     0        0 wlan0
Refer to https://netplan.io/reference/ for Netplan configuration.
Install Desktop Environment#
The installed Ubuntu version is for server which is designed to use minimal resources. To install a very lightweight desktop environment run bellow command:
Update packages:
sudo apt update && \
sudo apt upgrade -y
Install Unity desktop environment without addons:
sudo apt install ubuntu-desktop --no-install-recommends
Or install the lightweight Xubuntu desktop without addons:
sudo apt install xubuntu-desktop --no-install-recommends
Missing packages in a minimal installation
The option --no-install-recommends will not install many bloat packages (offices, mail, etc.,) that helps to reduce download and install size. However, it may cause GUI does not show up.
The most happened issue is missing fbdev which shown in the log:
...
(WW) Warning, couldn't open module fbdev
(EE) Failed to load module "fbdev" (module does not exist, 0)
...
Fatal server error:
(EE) no screens found(EE)
...
To install fbdev, run:
sudo apt install xserver-xorg-video-fbdev
Lubuntu vs Xubuntu
If you are looking for the most lightweight, Lubuntu is the choice to go. It uses the least system resources and comes with the fewest installed applications, unlike Xubuntu which packs some punch in polish and features meaning a lot more resource use. Xubuntu is relatively lightweight, as in, it’s lighter than Ubuntu and Kubuntu but Lubuntu is extremely lightweight.
Ubuntu Mate
Ubuntu Mate is an alternative Ubuntu version using MATE desktop environment. The latest version is available at https://ubuntu-mate.org/download/, while old releases are listed in https://releases.ubuntu-mate.org/archived.