Understand Linux for Tegra (L4T) system package
Linux for Tegra (Linux4Tegra, L4T) is a Linux based system software distribution by Nvidia for the Tegra processor series, used in platforms like the Nvidia Jetson board series. This system software comes with JetPack - a Software Development Kit (SDK) from Nvidia.
Last update: 2022-06-04
Table of Content
All versions of L4T are listed at https://developer.nvidia.com/embedded/linux-tegra-archive.
Components#
Each version of L4T has a main release page, such as https://developer.nvidia.com/embedded/linux-tegra-r3261, in which there are some interesting links:
-
The Jetson Linux Developer Guide for detailed documentation
e.g. l4t-3261
-
The L4T Driver Package (BSP)
-
The Sample Root Filesystem
e.g. tegra_linux_sample-root-filesystem_r32.6.1_aarch64.tbz2
-
The GCC Toolchain for BSP and Kernel
e.g. gcc-linaro-7.3.1-2018.05-x86_64_aarch64-linux-gnu.tar.xz
Overview#
For a full and detailed document, visit the main Jetson Linux Developer Guide.
This page is written using JetPack 4.6 with L4T Release 32 version 6.1.
Module name & P‑number#
Each module and devkit has a code called P-number. This code is used in build commands to select components.
For example: Jetson Nano Developer Kit
P3450-0000, which uses a non-production Jetson Nano moduleP3448-0000.
Refer to Devices Supported … section.
Preparation#
- Jetson developer kit is powered off, and put into Recovery Mode (RCM) by shorting the pin FC_REC to GND or holding the Force Recovery button.
- Power input is DC Jack (check Power Selection jumper)
- A USB cable connect from host machine to the debug USB port on board
-
Host machine’s installed QEMU:
sudo apt install -y qemu-user-static libxml2-utils
Environment Variables#
The directions that follow assume that:
-
${L4T_RELEASE_PACKAGE}contains the L4T release package’s name formed by target code and Linux version:- For Jetson Nano devices and Jetson TX1 modules:
Tegra210 - For Jetson Xavier NX, Jetson AGX Xavier series, and Jetson TX2 series modules:
Tegra186 - Linux version in the format
Linux_RXX.Y_aarch64.tbz2
- For Jetson Nano devices and Jetson TX1 modules:
-
${SAMPLE_FS_PACKAGE}contains the filename of the sample file system package:- All Jetson boards use
Tegra_Linux_Sample-Root-Filesystem_xxx.tbz2
- All Jetson boards use
-
${BOARD}contains the name of a configuration supported for your specific Jetson module and carrier board. Some examples are:jetson-nano-devkitjetson-tx2-devkitjetson-xavier-nx-devkit
Configuration files’ names follow this format:
<board_part_number>+<module_part_number>[-<modifier>].confwhere:
-
<board_part_number>is the P‑number (the full part number) for the NVIDIA carrier board. -
<module_part_number>is the P‑number for the Jetson module. -
<modifier>is an optional string that indicates several configurationsfor example, on a module that may have either eMMC or micro-SD card memory.
Build system image#
Install packages on host machine:
sudo apt install -y build-essential bison flex
-
Download the latest L4T release package and sample file system for your Jetson developer kit from https://developer.nvidia.com/linux-tegra.
-
Enter these commands to decompress the files and assemble the RootFS:
tar xf ${L4T_RELEASE_PACKAGE} && \ cd Linux_for_Tegra/rootfs/ && \ sudo tar xpf ../../${SAMPLE_FS_PACKAGE} && \ cd .. && \ sudo ./apply_binaries.sh -
Put your Jetson developer kit into Force Recovery Mode
Use
lsusbto check if Jetson board is reported as Nvidia APX modulee.g.:
Bus x Device y: ID 0955: nnnn Nvidia Corp.with nnnn is7f21for Jetson Nano module. -
Enter this command on your Linux host to flash (install) the L4T release onto the Jetson developer kit:
sudo ./flash.sh ${BOARD} mmcblk0p1
SD Card Image
To generate an image for flashing on SD Card, run jetson-disk-image-creator.sh:
sudo ./jetson-disk-image-creator.sh -o jetson-nano-oem.img -b jetson-nano -r 300
Skipping oem-config
The boot process runs oem‑config if no default user is defined.
If you don’t want to run oem-config to set up your system, you can run the host script l4t_create_default_user.sh to create a default user, and thus prevents oem‑config from running.
l4t_create_default_user.sh [‑u <user>] [‑p <password>] [‑n <hostname>] [‑‑autologin] [--accept-license]
How system image is built
Nvidia provides 2 packages, an L4T Driver Package (BSP) which contains all prebuild components for Jetson boards (bootloader, kernel, nvidia tools, scripts), and a Sample Root Filesystem which contains Ubuntu filesystem with prebuilt binaries (rootfs).
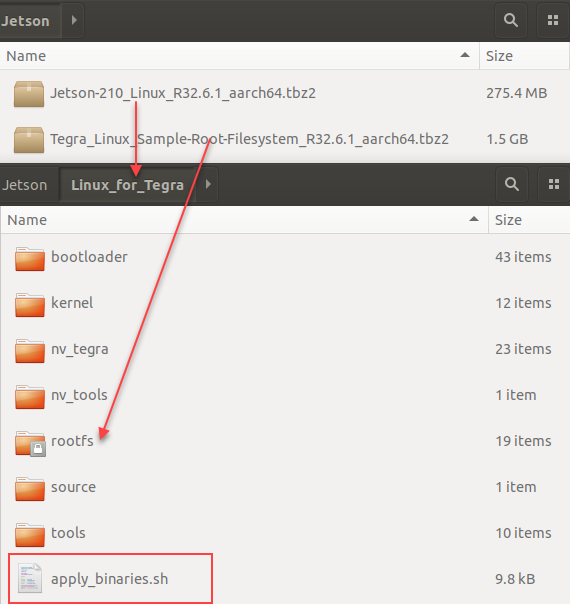
At first, extract the sample RootFs to the L4T BSP.
Next, running apply_binaries.sh will install nvidia packages into the rootfd:
vqtrong@ubuntu:~/Jetson/Linux_for_Tegra$ sudo ./apply_binaries.sh
Using rootfs directory of: /home/vqtrong/Jetson/Linux_for_Tegra/rootfs
Installing extlinux.conf into /boot/extlinux in target rootfs
/home/vqtrong/Jetson/Linux_for_Tegra/nv_tegra/nv-apply-debs.sh
Root file system directory is /home/vqtrong/Jetson/Linux_for_Tegra/rootfs
Copying public debian packages to rootfs
Start L4T BSP package installation
QEMU binary is not available, looking for QEMU from host system
Found /usr/bin/qemu-aarch64-static
Installing QEMU binary in rootfs
~/Jetson/Linux_for_Tegra/rootfs ~/Jetson/Linux_for_Tegra
Installing BSP Debian packages in /home/vqtrong/Jetson/Linux_for_Tegra/rootfs
...
Finally, the command flash.sh will assemble the system image from bootloader, DTS, RootFS:
- Edit
rootfs/bootby copying corresponding bootloader files frombootloader - Edit
initrdfor booting storage - A blank image
system.img.rawis created inbootloader, which is loopback formatted as ext4 and mounted. All the content inrootfswill be copied into the image file. - The raw system file is converted to a sparse file named
system.imgis smaller thansystem.img.raw, and expands during flash to become theAPPpartition.
Board ID(3448) version(400)
copying bctfile(/home/vqtrong/Jetson/Linux_for_Tegra/bootloader/t210ref/BCT/P3448_A00_lpddr4_204Mhz_P987.cfg)... done.
copying bootloader(/home/vqtrong/Jetson/Linux_for_Tegra/bootloader/t210ref/cboot.bin)... done.
copying initrd(/home/vqtrong/Jetson/Linux_for_Tegra/bootloader/l4t_initrd.img)... done.
Making Boot image... done.
Existing sosfile(/home/vqtrong/Jetson/Linux_for_Tegra/bootloader/nvtboot_recovery.bin) reused.
copying tegraboot(/home/vqtrong/Jetson/Linux_for_Tegra/bootloader/t210ref/nvtboot.bin)... done.
copying cpu_bootloader(/home/vqtrong/Jetson/Linux_for_Tegra/bootloader/t210ref/cboot.bin)... done.
copying bpffile(/home/vqtrong/Jetson/Linux_for_Tegra/bootloader/t210ref/sc7entry-firmware.bin)... done.
copying wb0boot(/home/vqtrong/Jetson/Linux_for_Tegra/bootloader/t210ref/warmboot.bin)... done.
Existing tosfile(/home/vqtrong/Jetson/Linux_for_Tegra/bootloader/tos-mon-only.img) reused.
Existing eksfile(/home/vqtrong/Jetson/Linux_for_Tegra/bootloader/eks.img) reused.
copying dtbfile(/home/vqtrong/Jetson/Linux_for_Tegra/kernel/dtb/tegra210-p3448-0000-p3449-0000-b00.dtb)... done.
Copying nv_boot_control.conf to rootfs
    populating kernel to rootfs... done.
    populating initrd to rootfs... done.
    populating kernel_tegra210-p3448-0000-p3449-0000-b00.dtb to rootfs... done.
Making system.img...
    populating rootfs from /home/vqtrong/Jetson/Linux_for_Tegra/rootfs ...  populating /boot/extlinux/extlinux.conf ... done.
    Sync'ing system.img ... done.
    Converting RAW image to Sparse image... done.
system.img built successfully.
Understanding this procedure enables us to make a custom system image which is shown in custom image guide.
Nvidia also provides a script to generate a base RootFS in /Linux_for_Tegra/tools/samplefs folder (This method uses full Ubuntu desktop RootFS, so the size is not small). For example, run:
sudo ./nv_build_samplefs.sh --abi aarch64 --distro ubuntu --version bionic
Architecture#
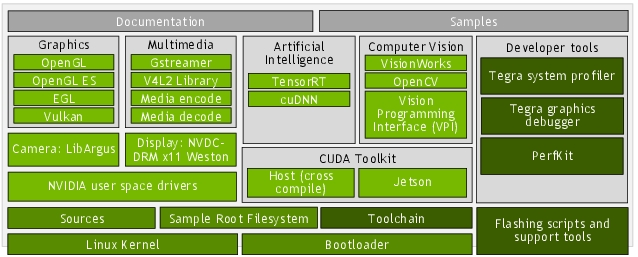
Jetson Board Support Package:
- Linux Kernel: A UNIX-like computer operating system kernel mostly used for mobile devices.
- Sample Root Filesystem derived from Ubuntu: A sample root filesystem of the Ubuntu distribution. Helps you create root filesystem for different configurations.
- Toolchain: A set of development tools chained together by stages that runs on various architectures.
- Bootloader: Boot software boot for initializing the system on the chip.
- Sources: Source code for kernel and multimedia applications.
- NVIDIA® Jetson™ User Space Drivers: Provides the NVIDIA drivers that run in the user-space.
- Flashing Support Scripts and Tools: A set of scripts and associated tools to assist in flashing your system.
- Sample Source Code and Applications: Sample source code for developing embedded applications for the Jetson platform.
Package Manifest#
This note some important information of the provided packages:
Bootloader
extlinux.conf: Boot configuration file.l4t_initrd.img: L4T initrd image based on minimal Ubuntu environment.XXXref/pYYYY-YYYY/u-boot.bin: U-Boot Bootloader binary.
Kernel
dtb/xxx-*.dtb: Device Tree Binary (DTB) files.Image: Kernel binary image.Image.gzis a compressed version.kernel_headers.tbz2: Kernel header files needed for compiling kernel modules.kernel_supplements.tbz2: Loadable kernel modules specific to the included kernel zImage that was built with the default configs enabled for the device.nvidia-l4t-kernel*.deb: DEB packages containing L4T dependencies and associated components.
Tools
jetson-disk-image-creator.sh: Creates a disk image for the target system based on specified command line options. Image can be flashed to a micro-SD card.l4t_create_default_user.sh: Creates a default user and skips runningoem-configat first boot.l4t_extract_deb.sh: Extracts Jetson Linux Debian packages.*-jetson-gpio-*.deb: Jetson GPIO packages.
NV_Tegra
install-nv-debs,nv-apply-debs.sh: Installs BSP packages on the target.l4t_deb_packages/*: Packages containing L4T dependencies and associated -components.nv_sample_apps/: NVIDIA sample applications.config.tbz2: Configuration files specific to the sample filesystem.nvidia_drivers.tbz2: NVIDIA driver components.weston.tbz2: NVIDIA Wayland support.
Hardware configuration#
Headers#
Each Jetson developer kit includes several expansion headers and connectors (collectively, “headers”):
- 40‑pin expansion header: Lets you connect a Jetson developer kit to off-the-shelf Raspberry Pi HATs (Hardware Attached on Top) such as Seeed Grove modules, SparkFun Qwiic products, and others. Many of the pins can be used either as GPIO or as “special function I/O” (SFIO) such as I2C, I2S, etc.
- 30‑pin expansion header: An NVIDIA custom header similar to the 40-pin header, available on NVIDIA® Jetson™ TX2 and Jetson TX1 platforms. Its pins can also be used as GPIO or as “special function I/O” (SFIO).
- CSI connector for camera input
- M.2 Key express slot for extra Bluetooth module or SSD Memory storage
The configuration of all the I/O pins on Jetson developer kits is statically defined, and is programmed into the device when it is flashed.
NVIDIA provides the Jetson Expansion Header Tool (also known as Jetson‑IO), a Python script that runs on a Jetson developer kit and lets you change pin configurations through a graphic user interface. Jetson‑IO modifies the Device Tree Blob (DTB) firmware so that a new configuration for the expansion headers is applied when the developer kit is rebooted.
To launch Jetson‑IO, enter this command on the developer kit:
sudo /opt/nvidia/jetson-io/jetson-io.py
Follow the instructions to configure headers and GPIO pins.
Voltage and Current Monitor#
Jetson modules include an on-board power monitor, the INA3221, to monitor the voltage and current of certain rails. The Jetson module feeds INA3221 outputs into SOC_THERM input. When one or more alert outputs are asserted, the SOC_THERM hardware reduces module power consumption to avoid violating current limits. The power monitor accepts configuration data from powermon.dtsi (the source file)
The Voltage and Current can be read from sysfs.
The powermon.dtsi file for the Jetson Nano module is located at:
hardware/nvidia/platform/t210/porg/kernel-dts/porg-platforms/tegra210-porg-powermon-p3448-0000-a00.dtsi
which defines the address for ina3221x, and the reporting channels:
- channel 0: POM_5V_IN
- channel 1: POM_5V_GPU
- channel 2: POM_5V_CPU
    i2c@546c0000 {
    ina3221x: ina3221x@40 {
        compatible = "ti,ina3221x";
        reg = <0x40>;
        status="okay";
        ti,trigger-config = <0x7003>;
        ti,continuous-config = <0x7607>;
        ti,enable-forced-continuous;
        #io-channel-cells = <1>;
        #address-cells = <1>;
        #size-cells = <0>;
        channel@0 {
            reg = <0x0>;
            ti,rail-name = "POM_5V_IN";
            ti,shunt-resistor-mohm = <5>;
        };

        channel@1 {
            reg = <0x1>;
            ti,rail-name = "POM_5V_GPU";
            ti,shunt-resistor-mohm = <5>;
        };

        channel@2 {
            reg = <0x2>;
            ti,rail-name = "POM_5V_CPU";
            ti,shunt-resistor-mohm = <5>;
        };
    };
};
Find the mounted point of ina3221x in i2c bus:
head /sys/bus/i2c/devices/*/name
==> /sys/bus/i2c/devices/6-0040/name <==
ina3221x
This means, ina3221x is mounted at bus i2c-6, address 0x40.
To read the mapping channel, find the rail name:
sudo head /sys/bus/i2c/devices/6-0040/iio\:device0/rail_name_*
==> /sys/bus/i2c/devices/6-0040/iio:device0/rail_name_0 <==
POM_5V_IN

==> /sys/bus/i2c/devices/6-0040/iio:device0/rail_name_1 <==
POM_5V_GPU

==> /sys/bus/i2c/devices/6-0040/iio:device0/rail_name_2 <==
POM_5V_CPU
To read total power, check the IN rail:
sudo cat /sys/bus/i2c/devices/6-0040/iio\:device0/in_voltage0_input
sudo cat /sys/bus/i2c/devices/6-0040/iio\:device0/in_current0_input
sudo cat /sys/bus/i2c/devices/6-0040/iio\:device0/in_power0_input
Note: use watch to monitor:
sudo watch -n1 "cat /sys/bus/i2c/devices/6-0040/iio\:device0/in_power0_input"
Improving System Performance#
The window system installed with L4T is Gnome, the standard Ubuntu window manager. In many cases you can reduce boot time, response time, memory consumption, and CPU utilization by replacing Gnome with a lightweight window manager. NVIDIA recommends the LXDE environment with Compton compositing manager for this purpose.
To install and enable LXDE:
-
Enter the commands:
sudo apt update && \ sudo apt install -y lxde compton -
Create the configuration file
/etc/xdg/autostart/lxde-compton.desktop, containing these commands:[Desktop Entry] Type=Application Name=Compton (X Compositor) GenericName=X compositor Comment=A X compositor TryExec=compton Exec=compton --backend glx -b OnlyShowIn=LXDE
Flashing and Booting#
Locate the most up-to-date usage information by running flash.sh –h (using the flash.sh script included in the release). The basic usage is as follows.
sudo ./flash.sh [options] <board> <rootdev>
Where:
-
optionsis one or more command line switches. All switches are optional. Switches are described in Flash Script Usage. -
<board>specifies the configuration to be applied to the device to be flashed. Values are listed in the table of device names in the topic Quick Start.flash.shgets the configuration from a configuration file named<board>.conf. -
<rootdev>specifies the type of device that is to be flashed. Use the valuemmcblk0p1to flash a local storage device (eMMC or SD card, depending on platform), as distinguished from NFS server, for example.
Flash a Partition only
You can flash a specific partition instead of flashing the whole device by using the command line option ‑k.
sudo ./flash.sh -k <partition_name> [--image <image_name>] <board> <rootdev>
Where:
-
<partition_name>is the name of the partition to be flashed. Possible values depend on the target device. For details, see the section Default Partition Overview in the topic Bootloader. -
<image_name>is the name of the image file. If omitted, flash.sh chooses the image file that was used to flash whole device.
Replace Kernel only
Since U‑Boot is required for Jetson Nano devices and Jetson TX1, and is the default bootloader for Jetson TX2, the image flashed to the kernel partition is actually a U‑Boot image. U‑Boot loads the Linux kernel from /boot/Image in the root file system.
For this reason, you cannot update Linux kernel image using the ‑k kernel option. You may update /boot/Image by either of these means:
-
Modify
/boot/extlinux/extlinux.confto add a new boot entry.Follow the instructions and example provided in
/boot/extlinux/extlinux.conf. By this means you can always usecporscpto replace/boot/Imagewith a custom-built kernel and launch it with U‑Boot. -
On T210 (Jetson Nano devices and Jetson TX1) devices only, connect the Jetson device’s recovery USB port to your host. Enter this command at the U‑Boot command prompt:
ums 0 mmc 1This connects eMMC (or a Jetson Nano with SD card) to the host as a set of USB mass storage devices (each partition as a device). You then can copy your custom kernel to
/boot/Imagedirectly.
U-Boot Customization#
U-Boot is the default bootloader for NVIDIA® Jetson™ Linux Driver Package (L4T) on supported platforms.
-
Install packages on host machine:
sudo apt install -y build-essential bison flex bc -
Nvidia uses the Linaro Aarch64 toolchain:
wget http://releases.linaro.org/components/toolchain/binaries/7.3-2018.05/aarch64-linux-gnu/gcc-linaro-7.3.1-2018.05-x86_64_aarch64-linux-gnu.tar.xzExtract toolchain:
mkdir $HOME/l4t-gcc && \
tar xf gcc-linaro-7.3.1-2018.05-x86_64_aarch64-linux-gnu.tar.xz -C $HOME/l4t-gcc
Set the build environment:
export CROSS_COMPILE=$HOME/l4t-gcc/gcc-linaro-7.3.1-2018.05-x86_64_aarch64-linux-gnu/bin/aarch64-linux-gnu- -
Move to
Linux_for_Tegra/sourcesfolder.Download source code:
git clone -n git://nv-tegra.nvidia.com/3rdparty/u-boot.gitGo to the source folder and check the tag:
cd u-boot && \
git tag
Checkout a tag that’s corresponding to the JetPack version, for example:
git checkout -b myuboot tegra-l4t-r32.6.1 -
Build U-Boot by executing:
make distclean
make <board_and_rev>_defconfig
make
Where
<board_and_rev>is described in the P-number of Jetson modules. For example, the Jetson Nano:make p3450-0000_defconfig -
After compiling, copy the binary file
u-boot.binto the corresponding folder inbootloader, such ast210ref/p3450-0000for Jetson Nano. -
To flash the new version of U-Boot, run the command:
sudo ./flash.sh -k LNX <platform> mmcblk0p1Where
<platform>is the SoC name or platform.
Kernel Customization#
You can manually rebuild the kernel used for the NVIDIA® Jetson™ Linux Driver Package.
Build Kernel#
-
Install packages on host machine:
sudo apt install -y build-essential bison flex bc -
Nvidia uses the Linaro Aarch64 toolchain:
wget http://releases.linaro.org/components/toolchain/binaries/7.3-2018.05/aarch64-linux-gnu/gcc-linaro-7.3.1-2018.05-x86_64_aarch64-linux-gnu.tar.xzExtract toolchain:
mkdir $HOME/l4t-gcc && \
tar xf gcc-linaro-7.3.1-2018.05-x86_64_aarch64-linux-gnu.tar.xz -C $HOME/l4t-gcc
Set the build environment:
export CROSS_COMPILE=$HOME/l4t-gcc/gcc-linaro-7.3.1-2018.05-x86_64_aarch64-linux-gnu/bin/aarch64-linux-gnu- -
To manually download and expand the kernel sources, in a browser, navigate to https://developer.nvidia.com/embedded/downloads, to locate and download the L4T source files for your release.
Extract the TBZ2 file.
tar -xjf public_sources.tbz2Extract the kernel source file.
cd Linux_for_Tegra/source/public && \
tar –xjf kernel_src.tbz2
The kernel source is extracted to the kernel subdirectory.
-
Set the shell variable with the command:
export TEGRA_KERNEL_OUT=$HOME/Jetson/build -
Execute the following commands to create the
.configfile:cd <kernel_source> mkdir -p $TEGRA_KERNEL_OUT make ARCH=arm64 O=$TEGRA_KERNEL_OUT tegra_defconfigWhere
<kernel_source>directory contains the kernel sources (e.g.kernel-4.9). -
Execute the following commands to build the kernel including all DTBs and modules:
make ARCH=arm64 O=$TEGRA_KERNEL_OUT -j<n>Where
<n>indicates the number of parallel processes to be used. -
Replace
<release_packagep>/Linux_for_Tegra/kernel/Image
with a copy of$TEGRA_KERNEL_OUT/arch/arm64/boot/Image. -
Replace the contents of
Linux_for_Tegra/kernel/dtb/
with the contents of$TEGRA_KERNEL_OUT/arch/arm64/boot/dts/. -
Execute the following commands to install the kernel modules:
sudo make ARCH=arm64 O=$TEGRA_KERNEL_OUT modules_install INSTALL_MOD_PATH=/Linux_for_Tegra/rootfs/ -
Optionally, archive the installed kernel modules using the following command:
cd <modules_install_path>
tar --owner root --group root -cjf kernel_supplements.tbz2 lib/modules
The installed modules can be used to provide the contents of
/lib/modules/<kernel_version>on the target system. Use the archive to replace the one in the kernel directory of the extracted release package prior to runningapply_binaries.shinLinux_for_Tegra/kernel/kernel_supplements.tbz2.
Kernel Optimization#
Disable Console over UART
Console printing over UART is a major bottleneck in kernel boot time. To reduce the bottleneck, you can reduce the volume of console printing over UART by removing console=ttyS0 from the platform configuration file, such as p3448-0000.conf.
Secondary Bootloader
You can remove U‑Boot as the secondary bootloader to remove boot time of u-boot. The following modifications are required before flashing:
-
Edit the common configuration file at, such as:
<top>/tegra_for_linux/p2771-000.conf -
Set
USE_UBOOTto 0.# To configure whether to use U-Boot, # do either of the following before running flash.sh: # 1) Set environment variable USE_UBOOT to 0 or 1. # 2) Edit the line below to set USE_UBOOT to 0 or 1. if [ -z "${USE_UBOOT}" ]; then USE_UBOOT=0; fi;