Build Android system and Kernel images
AOSP, led by Google, is an open source operating system for mobile devices. Andoid now aday can run on many different devices, including Vehicle Infortainment systems. Android Automotive has the base of Android platform, with additional functions for IVI systems. It well supports apps built for Android as well as those built for Android Auto.
Last update: 2022-06-30
Table of Content
This guide is based on AOSP android-10.0.0_r47 and android-12.1.0_r8
Android Open Source Project#
Android is an open source software stack created for a wide array of devices with different form factors. Android’s primary purpose is to create an open software platform available for carriers, OEMs, and developers to make their innovative ideas a reality and to introduce a successful, real-world product that improves the mobile experience for users.

Android development releases are organized into families, with alphabetical codenames. You can look up the codenames and the version numbers in Codenames, Tags, and Build Numbers.
Android Code Search allows you to search AOSP without downloading anything. You can use Code Search to view the AOSP source code, switch between open source branches, and navigate cross-references.
AOSPXRef is a web-based code browsers similar to Android Code Search.
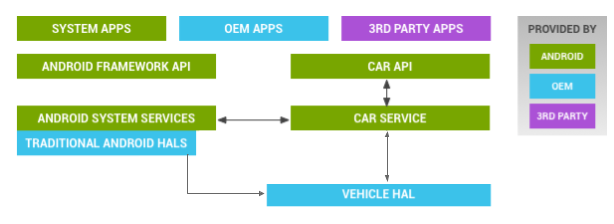
Android Automotive#
Android Automotive is a base Android platform that runs pre-installed IVI system Android applications as well as optional second- and third-party Android Applications. Android Automotive offers openness, customization, and scale to automotive infotainment systems and head units.
These things below can be confusing:
-
Android Auto is a platform running on the user’s phone, projecting the Android Auto user experience to a compatible in-vehicle infotainment system over a USB connection. Android Auto supports apps designed for in-vehicle use.
-
Android Automotive is an operating system and platform running directly on the in-vehicle hardware. It is a full-stack, open source, highly customizable platform powering the infotainment experience. Android Automotive supports apps built for Android as well as those built for Android Auto.
Google Automotive Services (GAS) is a collection of applications and services that automotive OEMs can choose to license and integrate into their in-vehicle infotainment (IVI) systems.
Build AOSP System Image#
The official guide at https://source.android.com/setup/build/building usually is updated to the latest version. Building an older version of AOSP may need some modifications.
Preparation#
Host machine
It is recommended to have Ubuntu 20.04 LTS, because Windows and MacOS are not supported, and Google repo is updated to Python 3.
You can optionally follow some tweaks to get better performance on your host machine such as: use noatime and remove journal feature of disk storing source code.
Host packages
sudo apt install \
    git curl \
    build-essential flex bison \
    libncurses5 libssl-dev libelf-dev
Repo and Git tool
Install repo from the package management:
sudo apt install repo
If it is not working, try to install manually:
mkdir -p ~/.bin
curl https://storage.googleapis.com/git-repo-downloads/repo > ~/.bin/repo
chmod a+rx ~/.bin/repo
echo 'PATH="${HOME}/.bin:${PATH}"' >> ~/.bashrc
source ~/.bashrc
On Ubuntu 20.04, /usr/bin/env/python is not pointing to python3, so install below package:
sudo apt install python-is-python3
Set git user:
git config --global user.email "vuquangtrong@gmail.com"
git config --global user.name "vuquangtrong"
Download and Build#
Git clone modes
Read details in Get up to speed with partial clone and shallow clone.
-
Full clone
This is the default mode. All blobs and trees are downloaded.
-
Partial clone
If using Git version 2.19 or greater,
--partial-cloneoption is used to parialy download the needed objects.-
Blobless: Remove all file history with the option:
--partial-clone --clone-filter=blob:none -
Treeless: Remove all directory history with the option:
--partial-clone --clone-filter=tree:0
-
-
Shallow clone
An older feature that does something very similar to a Treeless clone is Shallow clone with the option
--depth=1. This truncates the history to only download current commit.
Android version
| Version | API | Codename | Release date | Major changes |
|---|---|---|---|---|
| 12.1 | 32 | S | Mar 2022 | |
| 12 | 31 | S | Oct 2021 | |
| 11 | 30 | R | Sep 2020 | New Permission Controls |
| 10 | 29 | Q | Mar 2019 | HIDL is deprecated, use AIDL every where |
| 9 | 28 | P | Aug 2018 | |
| 8.1 | 27 | O | Dec 2017 | |
| 8.0 | 26 | O | Aug 2017 | Use HIDL instead of classical HAL |
| 7.1 | 25 | N | Aug 2016 |
Initialize the repo:
Go to https://android.googlesource.com/platform/manifest and select a target branch.
In this example, use shallow clone to reduce download time. If you need to read full log, or contribute back to the upstream repo, please fully clone the repo.
export AOSP_BRANCH="android-10.0.0_r47"
mkdir $AOSP_BRANCH && cd $AOSP_BRANCH
repo init \
    -u https://android.googlesource.com/platform/manifest \
    -b $AOSP_BRANCH \
    --depth=1
export AOSP_BRANCH="android-12.1.0_r8"
mkdir $AOSP_BRANCH && cd $AOSP_BRANCH
repo init \
    -u https://android.googlesource.com/platform/manifest \
    -b $AOSP_BRANCH \
    --depth=1
Download source code:
To speed up, use the -c (current branch) option.
repo sync -c -j$(nproc) && sync
The download takes few hours to complete.
Apply modifications
There is one Python 2 script in AOSP 10.0.0_r47 which needs modified:
/device/generic/goldfish/tools/mk_combined_img.py.
Install Python 2:
sudo apt install python2
Then edit the she-bang of the mk_combined_img.py script to use Python 2:
- #!/usr/bin/python
+ #!/usr/bin/python2
All build scripts are converted to Python 3.
Setup environment:
source build/envsetup.sh
Run lunch with no arguments to list all targets.
lunch
You're building on Linux

Lunch menu... pick a combo:
    1. aosp_arm-eng
    2. aosp_arm64-eng
    3. aosp_blueline-userdebug
    4. aosp_bonito-userdebug
    5. aosp_car_arm-userdebug
    6. aosp_car_arm64-userdebug
    7. aosp_car_x86-userdebug
    8. aosp_car_x86_64-userdebug
    9. aosp_cf_arm64_phone-userdebug
    10. aosp_cf_x86_64_phone-userdebug
    11. aosp_cf_x86_auto-userdebug
    12. aosp_cf_x86_phone-userdebug
    13. aosp_cf_x86_tv-userdebug
    14. aosp_crosshatch-userdebug
    15. aosp_marlin-userdebug
    16. aosp_sailfish-userdebug
    17. aosp_sargo-userdebug
    18. aosp_taimen-userdebug
    19. aosp_walleye-userdebug
    20. aosp_walleye_test-userdebug
    21. aosp_x86-eng
    22. aosp_x86_64-eng
    23. beagle_x15-userdebug
    24. fuchsia_arm64-eng
    25. fuchsia_x86_64-eng
    26. hikey-userdebug
    27. hikey64_only-userdebug
    28. hikey960-userdebug
    29. hikey960_tv-userdebug
    30. hikey_tv-userdebug
    31. m_e_arm-userdebug
    32. mini_emulator_arm64-userdebug
    33. mini_emulator_x86-userdebug
    34. mini_emulator_x86_64-userdebug
    35. poplar-eng
    36. poplar-user
    37. poplar-userdebug
    38. qemu_trusty_arm64-userdebug
    39. uml-userdebug
Which would you like? [aosp_arm-eng]:
lunch
You're building on Linux

Lunch menu... pick a combo:
    1. aosp_arm-eng
    2. aosp_arm64-eng
    3. aosp_barbet-userdebug
    4. aosp_blueline-userdebug
    5. aosp_blueline_car-userdebug
    6. aosp_bonito-userdebug
    7. aosp_bonito_car-userdebug
    8. aosp_bramble-userdebug
    9. aosp_bramble_car-userdebug
    10. aosp_car_arm-userdebug
    11. aosp_car_arm64-userdebug
    12. aosp_car_x86-userdebug
    13. aosp_car_x86_64-userdebug
    14. aosp_cf_arm64_auto-userdebug
    15. aosp_cf_arm64_phone-userdebug
    16. aosp_cf_x86_64_foldable-userdebug
    17. aosp_cf_x86_64_pc-userdebug
    18. aosp_cf_x86_64_phone-userdebug
    19. aosp_cf_x86_64_tv-userdebug
    20. aosp_cf_x86_auto-userdebug
    21. aosp_cf_x86_phone-userdebug
    22. aosp_cf_x86_tv-userdebug
    23. aosp_coral-userdebug
    24. aosp_coral_car-userdebug
    25. aosp_crosshatch-userdebug
    26. aosp_crosshatch_car-userdebug
    27. aosp_crosshatch_vf-userdebug
    28. aosp_flame-userdebug
    29. aosp_flame_car-userdebug
    30. aosp_oriole-userdebug
    31. aosp_oriole_car-userdebug
    32. aosp_raven-userdebug
    33. aosp_raven_car-userdebug
    34. aosp_redfin-userdebug
    35. aosp_redfin_car-userdebug
    36. aosp_redfin_vf-userdebug
    37. aosp_sargo-userdebug
    38. aosp_sargo_car-userdebug
    39. aosp_slider-userdebug
    40. aosp_sunfish-userdebug
    41. aosp_sunfish_car-userdebug
    42. aosp_trout_arm64-userdebug
    43. aosp_trout_x86-userdebug
    44. aosp_whitefin-userdebug
    45. aosp_x86-eng
    46. aosp_x86_64-eng
    47. arm_krait-eng
    48. arm_v7_v8-eng
    49. armv8-eng
    50. armv8_cortex_a55-eng
    51. armv8_kryo385-eng
    52. beagle_x15-userdebug
    53. beagle_x15_auto-userdebug
    54. car_ui_portrait-userdebug
    55. car_x86_64-userdebug
    56. db845c-userdebug
    57. fuchsia_arm64-eng
    58. fuchsia_x86_64-eng
    59. gsi_car_arm64-userdebug
    60. gsi_car_x86_64-userdebug
    61. hikey-userdebug
    62. hikey64_only-userdebug
    63. hikey960-userdebug
    64. hikey960_tv-userdebug
    65. hikey_tv-userdebug
    66. pixel3_mainline-userdebug
    67. poplar-eng
    68. poplar-user
    69. poplar-userdebug
    70. qemu_trusty_arm64-userdebug
    71. sdk_car_arm-userdebug
    72. sdk_car_arm64-userdebug
    73. sdk_car_portrait_x86_64-userdebug
    74. sdk_car_x86-userdebug
    75. sdk_car_x86_64-userdebug
    76. silvermont-eng
    77. uml-userdebug
    78. yukawa-userdebug
    79. yukawa_sei510-userdebug

Which would you like? [aosp_arm-eng]:
Target in format <product_name>-<build_variant> where build_variant can be:
user: Limited access; suited for productionuserdebug: Like user but with root access and debug capability; preferred for debuggingeng: Development configuration with additional debugging tools
Select target:
lunch aosp_car_x86_64-eng
============================================
PLATFORM_VERSION_CODENAME=REL
PLATFORM_VERSION=10
TARGET_PRODUCT=aosp_car_x86_64
TARGET_BUILD_VARIANT=eng
TARGET_BUILD_TYPE=release
TARGET_ARCH=x86_64
TARGET_ARCH_VARIANT=x86_64
TARGET_2ND_ARCH=x86
TARGET_2ND_ARCH_VARIANT=x86_64
HOST_ARCH=x86_64
HOST_2ND_ARCH=x86
HOST_OS=linux
HOST_OS_EXTRA=Linux-5.13.0-30-generic-x86_64-Ubuntu-20.04.4-LTS
HOST_CROSS_OS=windows
HOST_CROSS_ARCH=x86
HOST_CROSS_2ND_ARCH=x86_64
HOST_BUILD_TYPE=release
BUILD_ID=QP1A.190711.019
OUT_DIR=out
============================================
lunch sdk_car_x86_64-eng
============================================
PLATFORM_VERSION_CODENAME=REL
PLATFORM_VERSION=12
TARGET_PRODUCT=sdk_car_x86_64
TARGET_BUILD_VARIANT=eng
TARGET_BUILD_TYPE=release
TARGET_ARCH=x86_64
TARGET_ARCH_VARIANT=x86_64
TARGET_2ND_ARCH=x86
TARGET_2ND_ARCH_VARIANT=x86_64
HOST_ARCH=x86_64
HOST_2ND_ARCH=x86
HOST_OS=linux
HOST_OS_EXTRA=Linux-5.13.0-51-generic-x86_64-Ubuntu-20.04.4-LTS
HOST_CROSS_OS=windows
HOST_CROSS_ARCH=x86
HOST_CROSS_2ND_ARCH=x86_64
HOST_BUILD_TYPE=release
BUILD_ID=SQ3A.220605.009.B1
OUT_DIR=out
PRODUCT_SOONG_NAMESPACES=device/generic/goldfish device/generic/goldfish-opengl hardware/google/camera hardware/google/camera/devices/EmulatedCamera device/generic/goldfish device/generic/goldfish-opengl
============================================
A target can include other base targets, such as
device/generic/goldfish/car/sdk_car_x86_64.mk:
- inherit
device/generic/car/emulator/aosp_car_emulator.mk- inherit
$(SRC_TARGET_DIR)/product/sdk_x86_64.mk
Build:
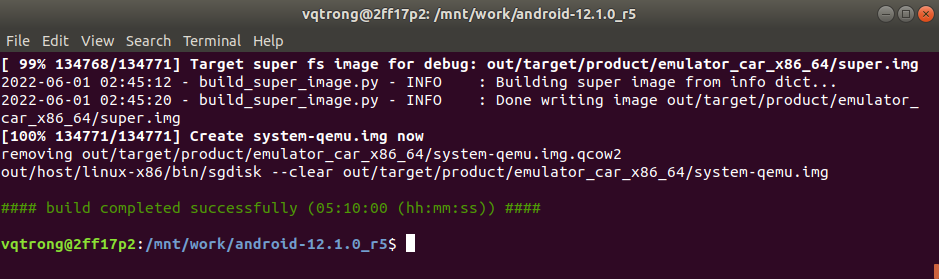
m all -j$(nproc)
The compilation takes hours to complete.
The minimum required amount of free memory is around 16 GB, and even with that, some configurations may not work. If you run into segfaults or other errors, try reducing your -j value.

Source Code structure#
There are many folders in the root folder of AOSP, here are short descriptions of them:
- art: Android Runtime
- Implementation of Android Runtime layer.
- bionic: C-runtime library
- Android is not using
glibclike most Linux distributions. Instead, the c-library is called bionic and is based mostly on BSD-derived sources. - bootable: Boot and Startup
- Bootloader, and some tools for recovery, flashing such as fastboot.
- build: Target and build directions
- An important file here is the envsetup.sh script that will help you a lot when working with the platform source. Running this script in a shell will enable commands to set up environment variables, build specific modules and grep in source code files.
- cts: Compatibility Test
- The test suite to ensure that a build complies with the Android specification.
- dalvik: Dalvik Virtual Machine
- This will build the virtual machine.
- development: Development platform
- Projects which are related to development such as the source code for the SDK and NDK tools. Normally not a folder you touch when working with the platform for a target.
- device: Product
- Build configuration, hardware modules and specific code for different devices.
- external: External open source components
- Contains source code for all external open source projects such as SQLite, FreeType and WebKit.
- frameworks: Android framework
- The implementation of key services such as the System Server with the Package- and Activity managers. A lot of the mapping between the java application APIs and the native libraries is also done here.
- hardware: Hardware implementation
- The Android Hardware Abstraction Layer specification and implementation.
- libnativehelper:
- Helper functions for use with JNI.
- kernel: Prebuilt kernel files
- Just binary files, source code does not come here.
- packages: Applications
- Source code of default application such as Contacts, Calendar.
- prebuilt: Binary tools
- Files that are distributed in binary form for convenience. Examples include the cross compilations toolchain for different development machines.
- system: Android core
- That is the minimal Linux system that is started before the Dalvik VM and any java based services are enabled. This includes the source code for the
initprocess and the defaultinit.rcscript that provide the dynamic configuration of the platform. - sdk: Base additional apps
- Useful apps that developers can leverage on and can be enhanced further as part of the operating system.
Build tricks#
Make targets
Here is a list of different make targets you can use to build different parts of the system:
make sdk- build the tools that are part of an SDK (adb, fastboot, etc.)make snod- build the system image from the current software binariesmake servicesmake runtimemake droid- make droid is the normal build.make all- make everything, whether it is included in the product definition or notmake clean- remove all built files (prepare for a new build).
Same asrm -rf out/<configuration>/make modules- shows a list of submodules that can be built.
List of allLOCAL_MODULEdefinitions.make <local_module>- make a specific module (note that this is not the same as directory name. It is theLOCAL_MODULEdefinition in theAndroid.mkfile)make clean-<local_module>- clean a specific modulemake bootimage TARGET_PREBUILT_KERNEL=/path/to/bzImage- create a new boot image with custom bzImage.
Helper macros and functions
There are some helper macros and functions that are installed when you source envsetup.sh. They are documented at the top of envesetup.sh, but here is information about a few of them:
hmm- List this help textlunch <product_name>-<build_variant>- Load product & build variant config (driver files, device specific configs, etc.).tapas [<App1> <App2> ...] [arm|x86|mips|armv5|arm64|x86_64|mips64] [eng|userdebug|user]- command is for building unbundled apps. If you don’t supply a build variant, it defaults toeng.provision- Flash device with all required partitions. Options will be passed on tofastboot.
Build Macros and functions
croot- change directory to the top of the treem- execute ‘make’ from the top of the tree (even if your current directory is somewhere else)mm- builds all the modules in the current directorymmm <dir1> ...- Builds all the modules in the supplied directories, but not their dependencies. To limit the modules being built use the syntax:mmm dir/:target1,target2.mma- Builds all the modules in the current directory, and their dependencies.mmma <dir1> ...- Builds all the modules in the supplied directories, and their dependencies.
Grep macros and functions
cgrep <PATTERN>- Greps on all local C/C++ files.ggrep <PATTERN>- Greps on all local Gradle files.jgrep <PATTERN>- Greps on all local Java files.resgrep <PATTERN>- Greps on all local res/*.xml files.mangrep <PATTERN>- Greps on all local AndroidManifest.xml files.mgrep <PATTERN>- Greps on all local Makefiles files.sepgrep <PATTERN>- Greps on all local sepolicy files.sgrep <PATTERN>- Greps on all local source files.godir <filename>- Go to the directory containing a file
Build logs#
You can find the individual commands that AOSP build system executes to compile the image in the file <aosp_root_dir>/out/verbose.log.gz. It is the compressed package that contains the verbose log of your last build. Just extract the verbose.log.gz package, and you will get verbose.log file.
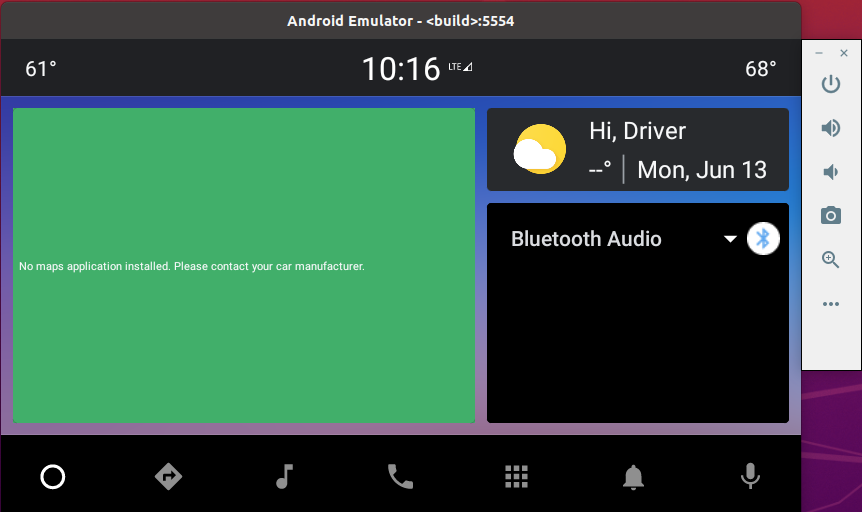
Run Emulator#
The Android emulator runs a virtual CPU that Google calls Goldfish. The Emulator, in fact, is a QEMU Virtual Machine which is prebuilt for a target AOSP.
VM acceleration#
Linux-based systems support VM acceleration through the KVM software package.
Check KVM:
sudo apt install -y cpu-checker
kvm-ok
INFO: /dev/kvm exists
KVM acceleration can be used
AOSP Emulator#
If you run emulator in the same terminal that is set up for building AOSP, system will call to the local emulator which is shipped as a prebuilt package in the AOSP source:
which emulator
/mnt/work/android-10.0.0_r47/prebuilts/android-emulator/linux-x86_64/emulator
With this prebuilt emulator, you may get some issue with new Kernel image, such as below error:
emulator: ERROR: Can't parse 'Linux version ' string in kernel image file: 'Linux version 4.14.282-g21e1e64073ff-dirty (build-user@
To fix this case, you need to find a suitable kernel version for your emulator. for example, kernel for latest Andoird 11 can not run on prebuilt QEMU for an old Android 11 version.
Emulator Command Line#
Emulator Command Line provides options to run an emulator. Basically, for development:
emulator -verbose -show-kernel -selinux permissive -writable-system
-verbose: displays which files and settings are actually selected when starting-shell: open root shell-show-kernel: option to show the kernel console, it’s good for debugging-selinux {disabled|permissive}: SELinux not enforced-writable-system: writable system image-no-boot-anim: disable the boot animation-no-snapshot: do not save system state-wipe-data: remove all user data
KVM Permission
If you see an error with this message:
ProbeKVM: This user doesn't have permissions to use KVM (/dev/kvm).\
The KVM line in /etc/group is: [LINE_NOT_FOUND]
If we see LINE_NOT_FOUND, the kvm group may need to be created along with permissions:
sudo groupadd -r kvm
Then ensure /lib/udev/rules.d/50-udev-default.rules contains something like:
# KERNEL=="kvm", GROUP="kvm", MODE="0660"
and then run:
sudo gpasswd -a $USER kvm
If we see kvm:... but no username at the end, running the following command may allow KVM access:
sudo gpasswd -a $USER kvm
You may need to log out and back in for changes to take effect.
To check the kernel version, run uname -a in the emulator kernel console, e.g. it’s version 5.10.66 in the above picture.
ADB
If you run abd in the same terminal that is set up for building AOSP, system will call to the local adb which is shipped as a prebuilt package in the AOSP source:
which adb
/mnt/work/android-10.0.0_r47/out/soong/host/linux-x86/bin/adb
You can install adb and connect to the Emulator from any terminal, but the version of adb may different to the one running on the emulator:
sudo apt install adb
Then list all devices:
adb devices
Android Debug Bridge version 1.0.39
Version 1:8.1.0+r23-5~18.04
Installed as /usr/lib/android-sdk/platform-tools/adb
And connect to the Emulator:
adb -e shell
Build Kernel#
Official build guide: https://source.android.com/setup/build/building-kernels
These instructions guide you through the process of selecting the right sources, building the kernel, and embedding the results into a system image built from the Android Open Source Project (AOSP).
Find Kernel Makefile#
The Android tree contains only prebuilt kernel binaries. When AOSP system image is build, it copies the prebuilt kernel image to the output folder.
I wrote a script show_make_tree.py to list all included Makefiles in a tree view:
#!/usr/bin/python3

import sys
from os.path import exists

__FILE    = "\u001b[32mFile   : " # green
__INHERIT = "\u001b[33mInherit: " # yellow
__SEARCH  = "\u001b[31mSearch : " # read
__INCLUDE = "\u001b[36mInclude: " # cyan
__NONE    = "\u001b[0m"           # reset

def indent(level, type, line):
    print(type, end="")
    for _ in range(level):
        print("  ", end="")
    print(line, end="")
    print(__NONE)

def find(file, level, type):
    if exists(file):
        indent(level, type, file)
        with open(file, "r") as f:
            for line in f.readlines():
                if line.startswith("$(call inherit-product"):
                    line = line.replace("$(SRC_TARGET_DIR)", "build/target")
                    line = line.split(",")[1]
                    line = line.strip()
                    line = line[:-1]
                    find(line, level+1, __INHERIT)
                if line.startswith("include"):
                    line = line.split(" ")[1]
                    line = line.strip()
                    find(line, level+1, __INCLUDE)
                if search in line:
                    indent(level+1, __SEARCH, line.strip())

if len(sys.argv) >= 3:
    root = sys.argv[1]
    search = sys.argv[2]

    print("Search for\n\u001b[31m" + search + "\u001b[0m\nin");
    find(root, 0, __FILE)
Our build target is aosp_car_x86_64, let find the makefile aosp_car_x86_64.mk:
find device -name aosp_car_x86_64.mk
device/generic/car/aosp_car_x86_64.mk
Run search for :kernel in the target Makefile:
device/generic/car/aosp_car_x86_64.mk:
python show_make_tree.py \
    "device/generic/car/aosp_car_x86_64.mk" \
    ":kernel"
Search for
:kernel
in
    device/generic/car/aosp_car_x86_64.mk
    build/target/product/aosp_x86_64.mk
      device/generic/goldfish/x86_64-vendor.mk
Found:  prebuilts/qemu-kernel/x86_64/$(PRODUCT_KERNEL_VERSION)/kernel-qemu2:kernel-ranchu
:kernel word is in the file device/generic/goldfish/x86_64-vendor.mk
PRODUCT_KERNEL_VERSION := 4.14

PRODUCT_PROPERTY_OVERRIDES += \
    vendor.rild.libpath=/vendor/lib64/libgoldfish-ril.so

PRODUCT_COPY_FILES += \
    device/generic/goldfish/data/etc/advancedFeatures.ini:advancedFeatures.ini \
    device/generic/goldfish/data/etc/encryptionkey.img:encryptionkey.img \
    prebuilts/qemu-kernel/x86_64/$(PRODUCT_KERNEL_VERSION)/kernel-qemu2:kernel-ranchu
PRODUCT_SDK_ADDON_COPY_FILES += \
    device/generic/goldfish/data/etc/advancedFeatures.ini:images/x86_64/advancedFeatures.ini \
    device/generic/goldfish/data/etc/encryptionkey.img:images/x86_64/encryptionkey.img \
    prebuilts/qemu-kernel/x86_64/$(PRODUCT_KERNEL_VERSION)/kernel-qemu2:images/x86_64/kernel-ranchu

PRODUCT_SHIPPING_API_LEVEL := 28
TARGET_USES_MKE2FS := true
...
So, it is clear that, the prebuilt kernel file at the version 4.14:
prebuilts/qemu-kernel/x86_64/4.14/kernel-qemu2
will be copied to:
out/target/product/generic_x86_64/kernel-ranchu.
Our build target is sdk_car_x86_64, let find the makefile sdk_car_x86_64.mk:
find device -name sdk_car_x86_64.mk
device/generic/goldfish/car/sdk_car_x86_64.mk
Run search for :kernel in the target Makefile:
device/generic/goldfish/car/sdk_car_x86_64.mk:
python show_make_tree.py \
    "device/generic/goldfish/car/sdk_car_x86_64.mk" \
    ":kernel"
Search for
:kernel
in
device/generic/goldfish/car/sdk_car_x86_64.mk
...
    build/target/product/sdk_x86_64.mk
        build/target/product/sdk_phone_x86_64.mk
        ...
        device/generic/goldfish/x86_64-vendor.mk
            device/generic/goldfish/x86_64-kernel.mk
Found:        $(EMULATOR_KERNEL_FILE):kernel-ranchu
Ok, the :kernel word is in the file device/generic/goldfish/x86_64-vendor.mk
include device/generic/goldfish/x86_64-kernel.mk

PRODUCT_COPY_FILES += \
    $(EMULATOR_KERNEL_FILE):kernel-ranchu

PRODUCT_SDK_ADDON_COPY_FILES += \
    $(EMULATOR_KERNEL_FILE):images/x86_64/kernel-ranchu
...
which includes device/generic/goldfish/x86_64-kernel.mk:
TARGET_KERNEL_USE ?= 5.10

KERNEL_MODULES_PATH := kernel/prebuilts/common-modules/virtual-device/$(TARGET_KERNEL_USE)/x86-64

KERNEL_MODULES_EXCLUDE := \
    $(KERNEL_MODULES_PATH)/virt_wifi.ko \
    $(KERNEL_MODULES_PATH)/virt_wifi_sim.ko

BOARD_VENDOR_RAMDISK_KERNEL_MODULES += \
    $(filter-out $(KERNEL_MODULES_EXCLUDE), $(wildcard $(KERNEL_MODULES_PATH)/*.ko))

EMULATOR_KERNEL_FILE := kernel/prebuilts/$(TARGET_KERNEL_USE)/x86_64/kernel-$(TARGET_KERNEL_USE)
So, it is clear that, the prebuilt kernel file at the version 5.10:
kernel/prebuilts/5.10/x86_64/kernel-5.10
will be copied to:
out/target/product/emulator_car_x86_64/kernel-ranchu.
Android Common Kernels#
Android Common Kernels is used to run on Emulator.
KMI kernel branch:
Android 11 introduced GKI, which separates the kernel into a Google-maintained kernel image and vendor maintained-modules, which are built separately.
Android 11:
android11-5.4
Android 12:
android12-5.4android12-5.10
Legacy dessert kernel branches:
Legacy dessert kernels were created to guarantee that new feature development didn’t interfere with merging from the Android Common Kernel.
Android 10:
android-4.9-qandroid-4.14-qandroid-4.19-q
Android 11
android-4.14-stableandroid-4.19-stable
Legacy release kernel branches:
Release kernels are maintained to provide backports of patches cited in the monthly Android Security Bulletin. They were created for each launch kernel when there was a new Android platform release.
Android 10:
android-4.9-q-releaseandroid-4.14-q-releaseandroid-4.19-q-release
Build custom kernel#
Download kernel and the target branch
The above example use the AOSP android-10.0.0_r47, which uses the kernel 4.14.
Checking on https://android.googlesource.com/kernel/manifest/+refs, there are some versions with 4.14 version:
common-android-4.14=common-android-4.14-stablehaskernel/commonatandroid-4.14-stable→ this is for Android 11.q-common-android-4.14haskernel/commonatandroid-4.14-q→ build config for goldfish is not completed.q-goldfish-android-goldfish-4.14-devhaskernel/commonatandroid-goldfish-4.14-dev→ having goldfish in name seems good for emulator.
export KERNEL_BRANCH="q-goldfish-android-goldfish-4.14-dev"
mkdir kernel-$KERNEL_BRANCH && cd kernel-$KERNEL_BRANCH
repo init \
    -u https://android.googlesource.com/kernel/manifest \
    -b $KERNEL_BRANCH \
    --depth=1
The above example use the AOSP android-12.1.0_r8, which uses the kernel 5.10. So, you can select the Android Common Kernel on branch common-android12-5.10.
export KERNEL_BRANCH="common-android12-5.10"
mkdir kernel-$KERNEL_BRANCH && cd kernel-$KERNEL_BRANCH
repo init \
    -u https://android.googlesource.com/kernel/manifest \
    -b $KERNEL_BRANCH \
    --depth=1
Then sync the source code:
repo sync -c -j$(nproc) && sync
Build the kernel:
Install libs for building kernel:
sudo apt install libssl-dev libelf-dev
A common kernels are generic, customizable kernels and therefore don’t define a default configuration. We have to set some environment settings:
| Environment variable | Description | Example |
|---|---|---|
BUILD_CONFIG |
Build config file from where you initialize the build environment. The location must be defined relative to the Repo root directory. Defaults to build.config. Mandatory for common kernels. | BUILD_CONFIG=common/build.config.<target>.x86_64 |
CC |
Override compiler to be used. Falls back to the default compiler defined by build.config. | CC=clang |
DIST_DIR |
Base output directory for the kernel distribution. | DIST_DIR=/path/to/my/dist |
OUT_DIR |
Base output directory for the kernel build. | OUT_DIR=/path/to/my/out |
SKIP_DEFCONFIG |
Skip make defconfig | SKIP_DEFCONFIG=1 |
SKIP_MRPROPER |
Skip make mrproper | SKIP_MRPROPER=1 |
bzImage vs vmlinux
- Big Z Image
bzImageis a compressed version of thevmlinuxwith extra headers for booting up. vmlinuxis a statically linked executable file that contains the Linux Kernel.
Build the kernel (without Link Time Optimization (LTO) for testing):
BUILD_CONFIG=goldfish/build.config.goldfish.x86_64 \
LTO=none \
build/build.sh
If the build succeeds, there is a log to show the kernel image destination:
Files copied to /mnt/work/kernel-q-goldfish-android-goldfish-4.14-dev/out/x86_64/dist
Check the kernel file:
file/mnt/work/kernel-q-goldfish-android-goldfish-4.14-dev/out/x86_64/dist/bzImage
Linux kernel x86 boot executable bzImage, version 4.14.175-g1aec57a9 (build-user@build-host) #1 SMP PREEMPT Wed May 4 05:03:19 UTC 2022, RO-rootFS, swap_dev 0x7, Normal VGA
Fast re-build
Not supported!
From Android 11, Google introduced GKI, which separates the kernel into a Google-maintained kernel image and vendor maintained-modules, which are built separately.
Build the kernel (without Link Time Optimization (LTO) for testing):
BUILD_CONFIG=common/build.config.gki.x86_64 \
LTO=none \
build/build.sh
After build complete, check the kernel file:
file out/android12-5.10/dist/bzImage
Linux kernel x86 boot executable bzImage, version 5.10.110-android12-9-00168-g131b12d50f16 (build-user@build-host) #1 SMP PREEMPT Fri May 27 16:2, RO-rootFS, swap_dev 0x15, Normal VGA
Build vendor’s modules, Android 12 Cuttlefish and Goldfish converge, so they share the same kernel virtual_device which can be built as below:
BUILD_CONFIG=common-modules/virtual-device/build.config.virtual_device.x86_64 \
LTO=none \
build/build.sh
Fast re-build
By default, Kernel is always built with mrproper target which removes all generated files + config + various backup files to create a clean build.
When developing on one or a few modules, we can skip the some initial steps and start re-build immediately:
BUILD_CONFIG=common-modules/virtual-device/build.config.virtual_device.x86_64 \
LTO=none \
FAST_BUILD=1 \
SKIP_MRPROPER=1 \
SKIP_DEFCONFIG=1 \
build/build.sh
Include custom kernel#
For making a vendor module for kernel, refer to Kernel Module guide.
Create a soft link to built custom kernel in AOSP root folder:
ln -s /mnt/work/kernel-q-goldfish-android-goldfish-4.14-dev kernel-custom
ln -s /mnt/work/kernel-common-android12-5.10 kernel-custom
Edit the kernel make file:
PRODUCT_KERNEL_VERSION := 4.14
PRODUCT_PROPERTY_OVERRIDES += \
   vendor.rild.libpath=/vendor/lib64/libgoldfish-ril.so

PRODUCT_COPY_FILES += \
    device/generic/goldfish/data/etc/advancedFeatures.ini:advancedFeatures.ini \
    device/generic/goldfish/data/etc/encryptionkey.img:encryptionkey.img \
    kernel-custom/out/x86_64/dist/bzImage:kernel-ranchu

PRODUCT_SDK_ADDON_COPY_FILES += \
    device/generic/goldfish/data/etc/advancedFeatures.ini:images/x86_64/advancedFeatures.ini \
    device/generic/goldfish/data/etc/encryptionkey.img:images/x86_64/encryptionkey.img \
    kernel-custom/out/x86_64/dist/bzImage:images/x86_64/kernel-ranchu

PRODUCT_SHIPPING_API_LEVEL := 28
TARGET_USES_MKE2FS := true
TARGET_KERNEL_USE ?= 5.10

KERNEL_MODULES_PATH := kernel-custom/out/android12-$(TARGET_KERNEL_USE)/dist

KERNEL_MODULES_EXCLUDE := \
    $(KERNEL_MODULES_PATH)/virt_wifi.ko \
    $(KERNEL_MODULES_PATH)/virt_wifi_sim.ko

BOARD_VENDOR_RAMDISK_KERNEL_MODULES += \
    $(filter-out $(KERNEL_MODULES_EXCLUDE), $(wildcard $(KERNEL_MODULES_PATH)/*.ko))

EMULATOR_KERNEL_FILE := $(KERNEL_MODULES_PATH)/bzImage
Finally, make system image again:
m all -j$(nproc)
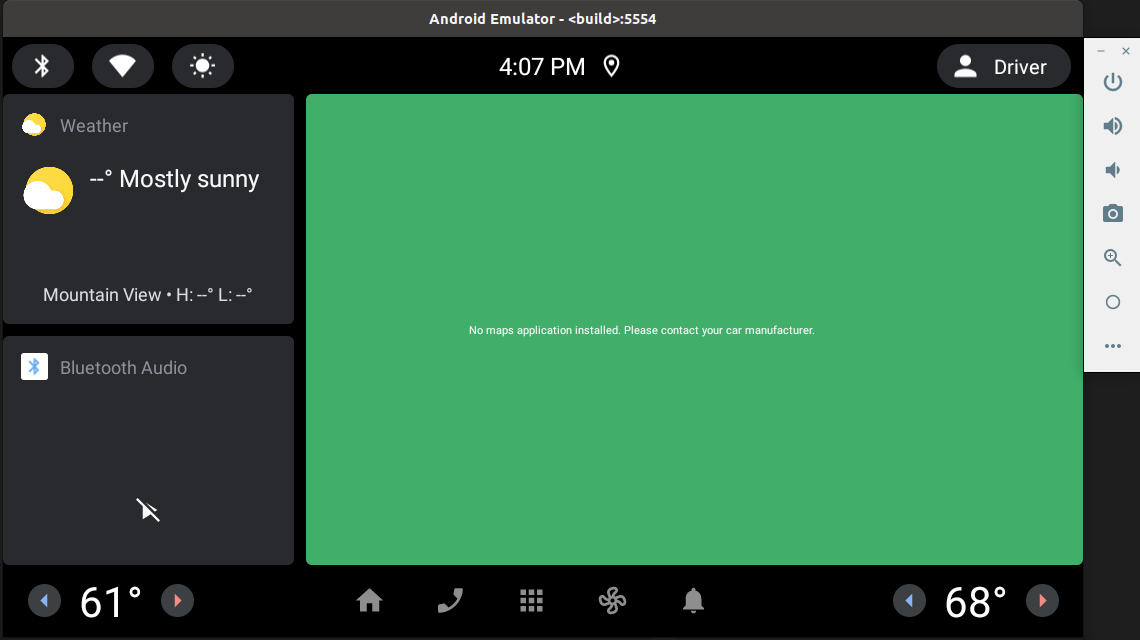
and run the emulator:
emulator -verbose -show-kernel -selinux permissive -writable-system
Use adb to access to the Emulator shell and check the Kernel version.
Soong Build System#
The Soong build system was introduced in Android 7.0 (Nougat) to replace Make. It leverages the Kati GNU Make clone tool and Ninja build system component to speed up builds of Android.
Blueprint file format
By design, Android.bp files are simple. They don’t contain conditionals or control flow statements; all complexity is handled by build logic written in Go.
A module in an Android.bp file starts with a module type followed by a set of properties in name: "value" format.
Every module must have a name property, and the value must be unique across all Android.bp files, except for the name property values in namespaces and prebuilt modules, which may repeat. The srcs property specifies the source files used to build the module, as a list of strings.
Soong can build many modules, refer to Soong Modules Reference and select a target module for more details.
Below are examples for cc_binary, and cc_library_shared with their corresponding old Makefiles:
Binary#
cc_binary {
    name: "invcase",
    srcs: ["invcase.c"],
    shared_libs: ["libinvcase"],
}
LOCAL_PATH:= $(call my-dir)
include $(CLEAR_VARS)
LOCAL_MODULE := invcase
LOCAL_SRC_FILES:= invcase.c
LOCAL_SHARED_LIBRARIES += libinvcase
include $(BUILD_EXECUTABLE)
Shared Library#
cc_library_shared {
    name: "libinvcase",
    srcs: ["libinvcase.c"],
}
LOCAL_PATH:= $(call my-dir)
include $(CLEAR_VARS)
LOCAL_MODULE := libinvcase
LOCAL_SRC_FILES:= libinvcase.c
include $(BUILD_SHARED_LIBRARY)