Set up Camera and test Video Encoders' Performance
Camera module on Raspberry Pi needs to be enabled manually before it can be used by applications. Popular drivers include Video For Linux 2, and OMX H264 hardware encoder which will be tested using FFmpeg (Linux package) and PiCamera (Python).
Last update: 2022-06-04
Table of Content
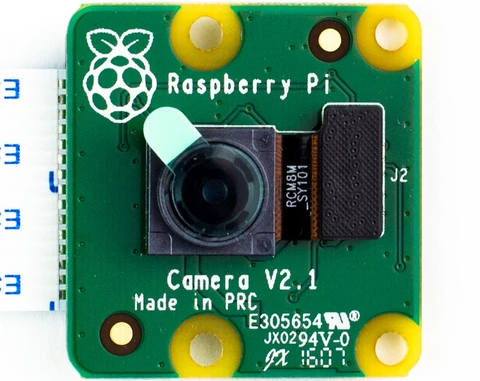
This tutorial is for setting up the official Raspberry Pi Camera module which is attached with a CSI cable. Other types of USB Camera should work on Pi out-of-the-box.
Enable Camera module#
Run raspi-config configuration tool, Then select Interfacing Options → Camera then select Yes:
sudo raspi-config
This method will automatically set start_x=1 in /boot/config.txt file.
Increase GPU memory#
Some video encoders need a big buffer to process video encoding or decoding. To increase the memory reserved for video processor, in the raspi-config configuration tool, go to Performance Options → GPU Memory then fill in 256 and select OK.
This method does the same thing with setting up gpu_mem=256 in /boot/config.txt.
Test Camera#
Detect the camera connection by running the checking tool:
vcgencmd get_camera
Which should print out supported=1 detected=1 telling that the camera is supported and connected.
vcgencmd is a command line utility that can get various pieces of information from the VideoCore GPU on the Raspberry Pi. Check more detail in Raspberry Pi/vcgencmd
Raspicam commands has a set of tools to work with the camera module: raspistill, raspivid, and raspiyuv.
-
Capture an image:
raspistill -o cam.jpg -
Record a video:
raspivid -o vid.h264
Video for Linux 2 — V4L2#
Under Linux, the standard APIs for cameras (including webcams) is V4L (Video for Linux), and a number of applications have been written that support any camera with a V4L driver. An independent developer has now written a user space V4L driver for the Raspberry Pi camera, but it is closed sourced, and can be a little slow because it runs as a user program rather than a kernel driver.
Recognizing that a V4L driver is needed, the Raspberry Pi Foundation reported that they were working with Broadcom to develop an official kernel V4L driver. As a kernel driver, it should be faster than the user space driver.
Finally, V4L2 was released under the name bcm2835-v4l2 which is included Raspberry Pi OS by default. Use v4l2-ctl utility tool to capture from the camera.
List devices#
v4l2-ctl --list-devices
bcm2835-codec-decode (platform:bcm2835-codec):
        /dev/video10
        /dev/video11
        /dev/video12

bcm2835-isp (platform:bcm2835-isp):
        /dev/video13
        /dev/video14
        /dev/video15
        /dev/video16

mmal service 16.1 (platform:bcm2835-v4l2):
        /dev/video0
Driver info#
v4l2-ctl -d /dev/video0 --all
Driver Info:
    Driver name      : bm2835 mmal
    Card type        : mmal service 16.1
    Bus info         : platform:bcm2835-v4l2
    Driver version   : 5.4.79
    Capabilities     : 0x85200005
            Video Capture
            Video Overlay
            Read/Write
            Streaming
    ...
Supported formats#
v4l2-ctl --list-formats
ioctl: VIDIOC_ENUM_FMT
        Type: Video Capture

        [0]: 'YU12' (Planar YUV 4:2:0)
        [1]: 'YUYV' (YUYV 4:2:2)
        [2]: 'RGB3' (24-bit RGB 8-8-8)
        [3]: 'JPEG' (JFIF JPEG, compressed)
        [4]: 'H264' (H.264, compressed)
        [5]: 'MJPG' (Motion-JPEG, compressed)
        [6]: 'YVYU' (YVYU 4:2:2)
        [7]: 'VYUY' (VYUY 4:2:2)
        [8]: 'UYVY' (UYVY 4:2:2)
        [9]: 'NV12' (Y/CbCr 4:2:0)
        [10]: 'BGR3' (24-bit BGR 8-8-8)
        [11]: 'YV12' (Planar YVU 4:2:0)
        [12]: 'NV21' (Y/CrCb 4:2:0)
        [13]: 'RX24' (32-bit XBGR 8-8-8-8)
Please take a note for RGB3, JPEG, H264, and MJPEG, which can be used in OpenCV, or streaming directly.
Capture JPEG Image#
v4l2-ctl --set-fmt-video=width=2592,height=1944,pixelformat=3 && \
v4l2-ctl --stream-mmap=3 --stream-count=1 --stream-to=somefile.jpg
Record H264 Video#
Note the value of height is 1088 not 1080.
v4l2-ctl --set-fmt-video=width=1920,height=1088,pixelformat=4 && \
v4l2-ctl --stream-mmap=3 --stream-count=100 --stream-to=somefile.264
FFmpeg#
The pre-built ffmpeg package of Pi already enables hardware accelerator support, with OpenMAX IL H.264 video encoder (h264_omx).
sudo apt install -y ffmpeg
An FFmpeg version with a specific library can be built by following this topic Compile FFmpeg with Hardware Accelerator.
Encoders#
To see all available encoders:
ffmpeg -encoders
If interested in h264 and mjpeg, use grep to search for the specific encoders:
ffmpeg -hide_banner -encoders | grep -E "h264|mjpeg"
V..... libx264              libx264 H.264 / AVC / MPEG-4 AVC / MPEG-4 part 10 (codec h264)
V..... libx264rgb           libx264 H.264 / AVC / MPEG-4 AVC / MPEG-4 part 10 RGB (codec h264)
V..... h264_omx             OpenMAX IL H.264 video encoder (codec h264)
V..... h264_v4l2m2m         V4L2 mem2mem H.264 encoder wrapper (codec h264)
VFS... mjpeg                MJPEG (Motion JPEG)
Check encoder options
Before using an encoder, check its options by help command in ffmpeg.
ffmpeg -h encoder=<format>
Here is the list of formats supported by OpenMAX IL H.264 video encoder (h264_omx):
ffmpeg -h encoder=h264_omx
Encoder h264_omx [OpenMAX IL H.264 video encoder]:
    General capabilities: delay
    Threading capabilities: none
    Supported pixel formats: yuv420p
h264_omx AVOptions:
    -omx_libname   <string>    ED.V...... OpenMAX library name
    -omx_libprefix <string>    ED.V...... OpenMAX library prefix
    -zerocopy      <int>       E..V...... Avoid copying input frames if possible (0 or 1) (default 1)
    -profile       <int>       E..V...... Set the encoding profile (from -99 to 100) (default -99)
        baseline    66         E..V......
        main        77         E..V......
        high        100        E..V......
Performance#
Next, try to record some short video (60 seconds) with H264 format using different encoders. To measure the performance, use a small tool to check CPU and Memory Usage in monitor — Script to check performance.
Video settings
All tests below use the same video settings:
- Video side: 1024x768
- Frame rate: 30 fps
- Input Length: 60 seconds
Note that ffmpeg will use v4l2 driver if user does not specify the driver!
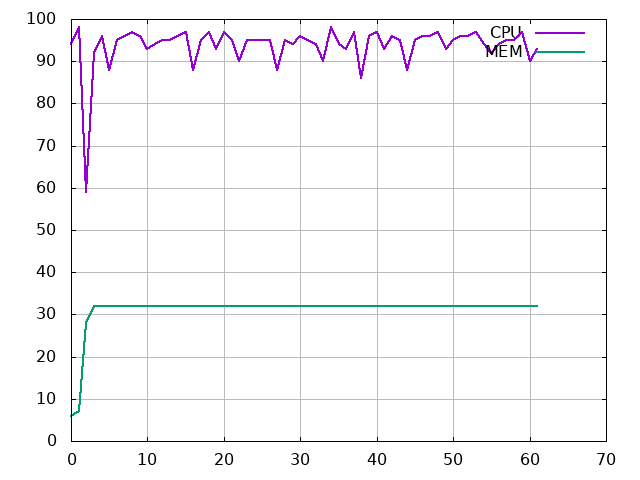
Raw to MJPEG (.avi)#
ffmpeg -y -hide_banner \
    -use_wallclock_as_timestamps 1 \
    -t 60 \
    -i /dev/video0 \
    -c:v mjpeg \
    raw_mjpeg.avi
-
Performance:
- Total time: 63 seconds
- Average %CPU: 93 (too high)
- Average %MEM: 31
- Input FPS: 4.8 (dropped input)
- Output FPS: 30
-
Quality:
- Format: JPEG
- Codec ID: MJPG
- Bit rate: 839 kb/s
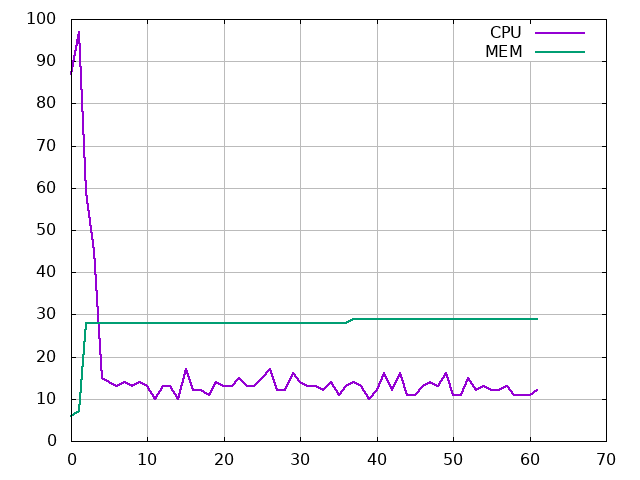
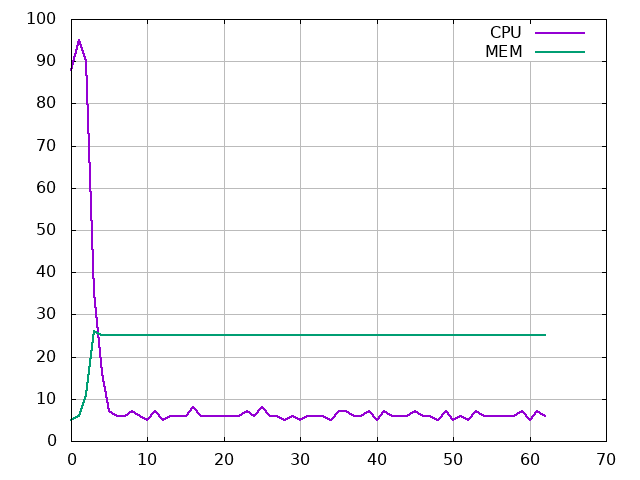
Raw to H264_OMX @8Mbps (.mp4)#
ffmpeg -y -hide_banner \
    -use_wallclock_as_timestamps 1 \
    -t 60 \
    -i /dev/video0 \
    -c:v h264_omx \
    -b:v 8M \
    raw_h264omx.mp4
-
Performance:
- Total time: 63 seconds
- Average %CPU: 16 (OK)
- Average %MEM: 27
- Input FPS: 30
- Output FPS: 30
-
Quality:
- Format: AVC (GOP: M=1, N=12)
- Codec ID: avc1
- Bit rate: 2 877 kb/s
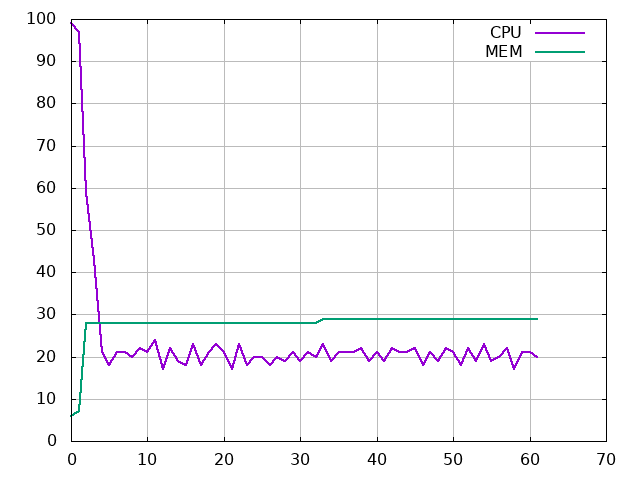
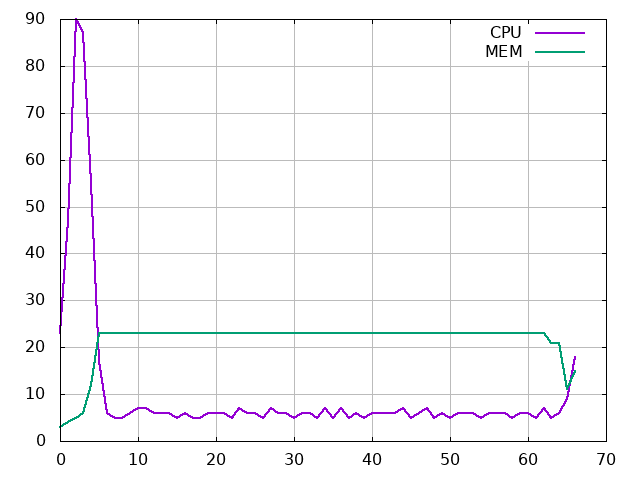
Raw to H264_V4L2M2M @8Mbps (.mp4)#
ffmpeg -y -hide_banner \
    -use_wallclock_as_timestamps 1 \
    -t 60 \
    -i /dev/video0 \
    -c:v h264_v4l2m2m \
    -b:v 8M \
    raw_h264v4l2m2m.mp4
-
Performance:
- Total time: 62 seconds
- Average %CPU: 23
- Average %MEM: 27
- Input FPS: 30
- Output FPS: 30
-
Quality:
- Format: AVC (GPO: M=1, N=60)
- Codec ID: avc1
- Bit rate: 1 783 kb/s
V4L2 MJPEG direct copy (.avi)#
ffmpeg -y -hide_banner \
    -use_wallclock_as_timestamps 1 \
    -t 60 \
    -input_format mjpeg \
    -i /dev/video0 \
    -c:v copy \
    -t 60 \
    mjpeg_avi.avi
-
Performance:
- Total time: 67 seconds
- Average %CPU: 10 (Good)
- Average %MEM: 21
- Input FPS: 30
- Output FPS: 30
-
Quality:
- Format: JPEG
- Codec ID: MJPG
- Bit rate: 10.2 Mb/s (very high bandwidth)
V4L2 H264 direct copy (.mp4)#
ffmpeg -y -hide_banner \
    -use_wallclock_as_timestamps 1 \
    -t 60 \
    -input_format h264 \
    -i /dev/video0 \
    -c:v copy \
    -t 60 \
    h264_mp4.mp4
-
Performance:
- Total time: 67 seconds
- Average %CPU: 10 (Good)
- Average %MEM: 24
- Input FPS: 30
- Output FPS: 30
-
Quality:
- Format: AVC (GPO: M=1, N=60)
- Codec ID: avc1
- Bit rate: 5 506 kb/s (OK)
Conclusion#
After above tests, it can be said that using compressed input format from v4l2 is much more effective than compressing by a software encoder.
Let’s add some timestamp to video by using drawtext filter with built-in expandable localtime variable in Text-expansion option.
ffmpeg -y -hide_banner \
    -use_wallclock_as_timestamps 1 \
    -t 10 \
    -i /dev/video0 \
    -vf "drawtext=text='%{localtime}':fontcolor=white:x=100:y=100" \
    -c:v h264_omx \
    -b:v 8M \
    raw_h264omx_text.mp4
Filter and stream-copy cannot be used together
Text needs inserted and each frame needs re-encoded, therefore, stream-copy is unavailable.
# this will not work
ffmpeg -y -hide_banner \
    -use_wallclock_as_timestamps 1 \
    -t 10 \
    -input_format h264 \
    -i /dev/video0 \
    -vf "drawtext=text='%{localtime}':fontcolor=white:x=100:y=100" \
    -c:v copy \
    -t 10 \
    h264_mp4_text.mp4
PiCamera#
The PiCamera package is a pure Python interface to the Raspberry Pi camera module for Python language. If using the Raspbian distro, probably it has picamera installed by default. Run a test to check it is installed or not:
python -c "import picamera"
python3 -c "import picamera"
If no module found, install picamera from the system’s package manager:
sudo apt install -y python-picamera python3-picamera
There are a lot of examples in the official guide. Here are some starting points:
Get maximum resolution of the camera
import picamera

with picamera.PiCamera() as cam:
    print(cam.MAX_RESOLUTION)
Take a snapshot
from time import sleep
from picamera import PiCamera

# setup a camera
camera = PiCamera()
camera.resolution = (1024, 768)

# camera warm-up time
sleep(2)

# capture an image
camera.capture('snapshot.jpg')
Now, for the testing purpose, let’s record a 60-second video from the camera and measure the resource usage with monitor, then use ffmpeg to convert raw h264 to mp4:
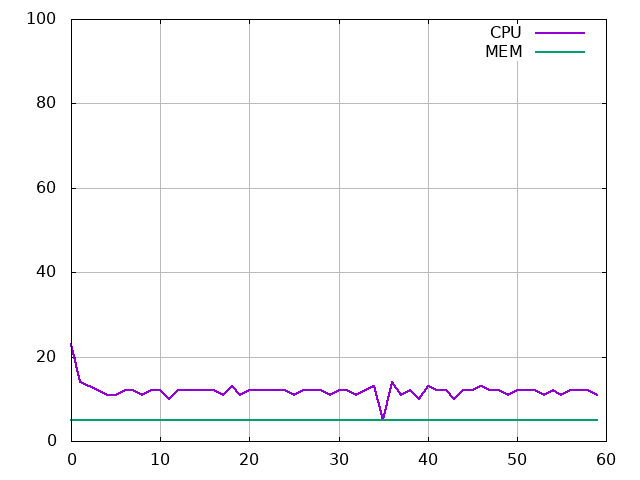
PiCamera H264 (.h264)#
Record a raw H264 video file
from picamera import PiCamera

# setup a camera
camera = PiCamera()
camera.resolution = (1024, 768)
camera.framerate = 30

# record a video
camera.start_recording('picamera.h264')
camera.wait_recording(60)
camera.stop_recording()
Convert to MP4 video file
ffmpeg -i picamera.h264 \
    -c:v copy picamera.mp4
-
Performance:
- Total time: 61 seconds
- Average CPU: 11 (Good)
- Average MEM: 5 (Good)
- Input FPS: 30
- Output FPS: 25
-
Quality:
- Format: AVC (GPO: M=1, N=60)
- Codec ID: avc1
- Bit rate: 3 302 kb/s (Good)
Picamera H264 (.h264) with Text overlay#
Now, try to detect how picamera can draw text on output video. Here is the test code:
from picamera import PiCamera
import datetime

TIMEFMT = '%Y-%m-%d %H:%M:%S.%f'

# setup a camera
camera = PiCamera()
camera.resolution = (1024, 768)
camera.annotate_text = datetime.datetime.now().strftime(TIMEFMT)

# record a video
camera.start_recording('picamera_text.h264')
start = datetime.datetime.now()

while (datetime.datetime.now() - start).seconds < 60:
  camera.annotate_text = datetime.datetime.now().strftime(TIMEFMT)
  camera.wait_recording(0.04) # 25fps

# stop it
camera.stop_recording()
Using picamera shows an impressive %CPU and %MEM usage, comparing to using FFmpeg. The result shows that the %CPU uses twice as much as it does in non-overlay text, while the %MEM keeps the same percentage.