SEGGER Real-Time Transfer - very fast Debugging
SEGGER's Real Time Transfer (RTT) is the proven technology for system monitoring and interactive user I/O in embedded applications. It combines the advantages of SWO and semihosting at very high performance. It can run without debugging session, and do not affect the real-time system. However, it is only supported by SEGGER J-Link probes.
Last update: 2022-06-29
Table of Content
J-Link RTT — Manual SEGGER_RTT.zip STM32-Tutorials
SEGGER RTT integration
- Download SEGGER_RTT.zip then add files to project
- Call
SEGGER_RTT_Init();at the beginning of the main function - Use
SEGGER_RTT_printf()to send output to up-channels - Enable
SEGGER_REDIRECTIONif you want to override the system calls to use nativeprintf().scanf()
Debugging#
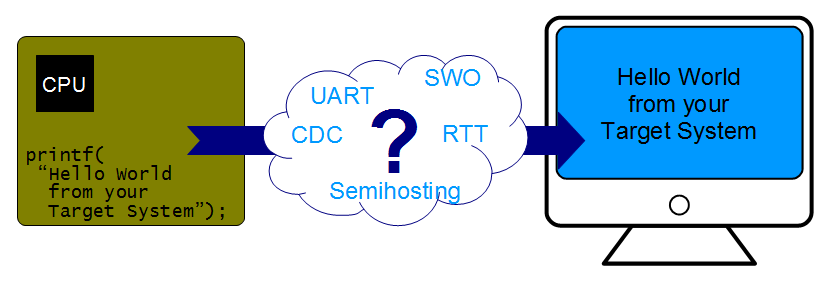
There are some debug techniques used to inspect the firmware running on ARM-based MCUs:
-
Semihosting: built-in to every ARM chips, need adding additional library and running in debug mode.
-
Console log: forward to a native UART port, a Virtual COM port through a USB port.
-
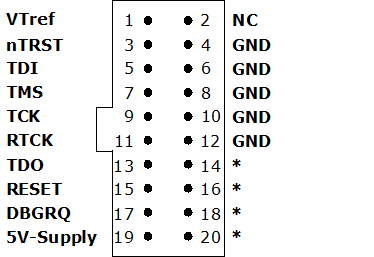
Serial Wire View (SWV): fast output over dedicated Single Wire Output (SWO) pin, but it’s only available on Cortex-M3+, and this is uni-direction communication.
-
Real Time Transfer (RTT): extremely fast but only work with SEGGER Debugger, can have a real-time bi-direction communication.
Real Time Transfer#
Visit the official J-Link RTT – Real Time Transfer on SEGGER website for more information.
SEGGER’s J-Link RTT utilizes the background memory access feature on Debug Access Port (DAP) on Cortex-M and RX MCUs to communicate between the MCU and the PC’s host application, through J-Link probes. RTT supports multiple channels in both directions, up to the host and down to the target, which can be used for different purposes and provide the most possible freedom to the user.
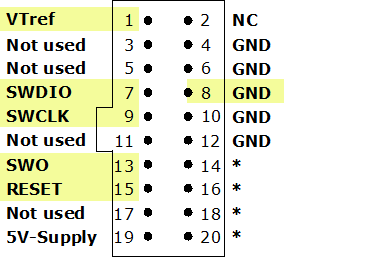
SEGGER RTT does not need any additional pin or hardware, it can be connected via the standard debug port (SWD) to the target. It does not require any configuration of the target or in the debugging environment and can even be used with varying target speeds. RTT can be used in parallel to a running debug session, without intrusion, as well as without any IDE or debugger at all.
SEGGER RTT can run on all ARM target through the SWD interface on a J-Link probe.
The RTT target code is shipped as part of the J-Link Software and Documentation Pack which can be found after installing the J-Link Software in the folder <installaton folder>/Samples/RTT.
How RTT Works#
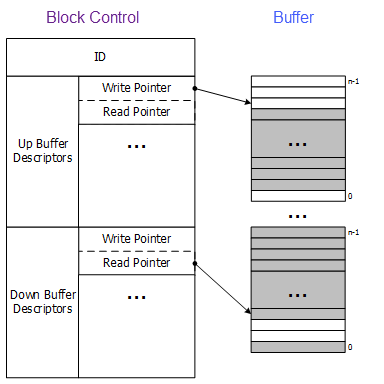
Real Time Transfer uses a SEGGER RTT Control Block structure in the target’s memory to manage data reads and writes. The control block contains an ID to make it findable in memory by a connected J-Link and a ring buffer structure for each available channel, describing the channel buffer and its state.
When RTT is active on the host computer, J-Link automatically searches for the SEGGER RTT Control Block in the target’s known RAM regions. The RAM regions or the specific address of the Control Block can also be set via the host applications to speed up detection or the block cannot be found automatically.
The default implementation uses one channel per direction, which are meant for printable terminal input and output. An additional up (to host) channel can for example be used to send profiling or event tracing data.
Each channel can be configured to be blocking or non-blocking. In blocking mode the application will wait when the buffer is full, until all memory could be written, resulting in a blocked application state but preventing data from getting lost. In non-blocking mode only data which fits into the buffer, or none at all, will be written, and the rest will be discarded. This allows running in real time, even when no debugger is connected. The developer does not have to create a special debug version and the code can stay in place in a release application.
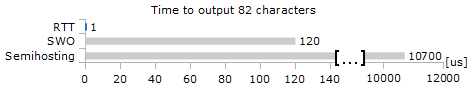
RTT Performance#
The performance of SEGGER RTT is significantly higher than any other technology used to output data to a host PC. An average line of text can be output in one microsecond or less. Basically it is only the time to do a single memcopy() call.
The maximum speed at which output data can be sent to the host depends on the target buffer size and target interface speed. Even with a small target buffer of 512 Bytes an RTT speed of up to 1 MiB/s is possible with a high interface speed and 0.5 MiB/s are possible with a regular J-Link model.
RTT APIs#
The SEGGER RTT implementation is written in ANSI C and can be integrated into any embedded application. RTT can be used via a simple and easy to use API. It is even possible to override the standard printf() functions to use RTT. Using RTT reduces the time taken for printf() to a minimum and allows printing debug information to the host PC, while the application is performing time critical, real time tasks.
The SEGGER RTT implementation includes a simple implementation of printf() which can be used to write a formatted string via RTT. SEGGER_RTT_Printf() is smaller than most standard library implementations and does not require heap and only a configurable amount of stack. However, it does not support printing double or float numbers.
| Function Name | Description |
|---|---|
SEGGER_RTT_Read() |
Read data from an input buffer. |
SEGGER_RTT_Write() |
Write data to an output buffer. |
SEGGER_RTT_WriteString() |
Write a zero-terminated string to an output buffer. |
SEGGER_RTT_printf() |
Write a formatted string to an output buffer. |
SEGGER_RTT_GetKey() |
Get one character from input buffer 0. (non-blocking) |
SEGGER_RTT_HasKey() |
Check if a character is available in input buffer 0. |
SEGGER_RTT_WaitKey() |
Wait for a character to be available in input buffer 0 and get it. (blocking) |
SEGGER_RTT_ConfigUpBuffer() |
Configure an up (output) buffer. |
SEGGER_RTT_ConfigDownBuffer() |
Configure a down (input) buffer. |
SEGGER_RTT_Init() |
Initialize RTT Control Block structure when using RAM only targets. |
SEGGER_RTT_SetTerminal() |
Set the “virtual” Terminal to use for output on channel 0 via Write and WriteString. |
SEGGER_RTT_TerminalOut() |
Send a zero-terminated string via a “virtual” terminal. |
Integrate RTT#
RTT in the target MCU is provided freely. Firstly, download the J-Link software and install it.
Under the installation folder, the source code of RTT on MCU is found in Samples\RTT. At the time of writing this guide, the version of J-Link is 7.64, therefore, user can find the SEGGER_RTT.zip file there.
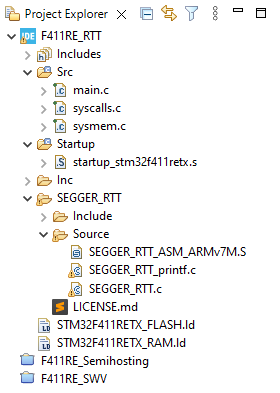
Add RTT files#
│ License.txt
│ README.txt
│
├─RTT
│   SEGGER_RTT_Conf.h           # Configuration
│   SEGGER_RTT.h                # Main header
│   SEGGER_RTT.c                # Main implementation
│   SEGGER_RTT_printf.c         # Print functions
│   SEGGER_RTT_ASM_ARMv7M.S     # for Cortex-M3/M4/M7
│
├─Syscalls
│   SEGGER_RTT_Syscalls_GCC.c   # redirection for GCC and newlib
│   SEGGER_RTT_Syscalls_IAR.c   # redirection for IAR
│   SEGGER_RTT_Syscalls_KEIL.c  # redirection for KEIL ARM
│   SEGGER_RTT_Syscalls_SES.c   # redirection for Segger Embedded System
│
└─Examples
    Main_RTT_InputEchoApp.c     # echo characters
    Main_RTT_MenuApp.c          # use character to select an option
    Main_RTT_PrintfTest.c       # print log with format
    Main_RTT_SpeedTestApp.c     # measure execution time
As RTT implementation is target independent, so we will start with a bare project without using any CMSIS or LL/HAL library.
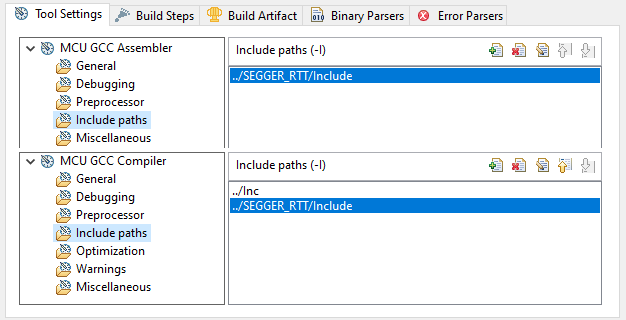
Add Include paths#
Open the _Project Properties__ → C/C++ Build → Settings. Then add ../SEGGER_RTT/Include into to the Include paths of both GCC Assembler and GCC Compiler
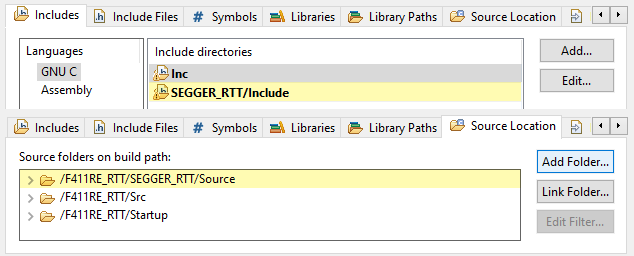
Add Source files#
To make RTT source files get compiled, add the folder /SEGGER_RTT/Source into the Source Location list, and add the folder /SEGGER_RTT/Include in the Paths and Symbols setting under the C/C++ General property.
Usage RTT#
In the main.c file, include the SEGGER_RTT.h firstly to import RTT APIs.
Inside the int main() function, call to SEGGER_RTT_Init() to initialize the SEGGER RTT Control Block and the Channel 0.
We are going to:
-
Add a new channel named Log on Channel 1
- 32 Bytes buffer, Up to Host
-
Create a variable
counterand increase it every second -
Send different data to virtual
0,1,2on the Channel 0 (named Terminal by default)
#include <stdint.h>
#include <SEGGER_RTT.h>

/* add channel 1: log */
static uint8_t logBuffer[32];

char counter = 0;

int main(void)
{
  SEGGER_RTT_Init();

  /* add channel 1: log */
  SEGGER_RTT_ConfigUpBuffer(
    1, "Log", logBuffer, sizeof(logBuffer),
    SEGGER_RTT_MODE_NO_BLOCK_TRIM
  );

  while(1) {
    // Channel 0 - virtual terminal 0
    SEGGER_RTT_printf(0, "[0:0] counter = %d\n", counter++);

    // switch to Channel 0 - virtual terminal 1
    SEGGER_RTT_SetTerminal(1);

    SEGGER_RTT_printf(0, "[0:1] negative = %d\n", -counter);

    // back to Channel 0 - virtual terminal 0
    SEGGER_RTT_SetTerminal(0);

    // print to Channel 0 - virtual terminal 2
    SEGGER_RTT_TerminalOut(2, "[0:2] nothing\n");

    // print to Channel 1
    SEGGER_RTT_printf(1, "[1:x] last_digit = %d\n", counter%2);

    for(int delay=160000; delay--;);
  }
}
RTT Viewer#
J-Link RTT Viewer is the main Windows GUI application to use all features of RTT on the debugging host. RTT Viewer can be used stand-alone, opening an own connection to J-Link and target or in parallel to a running debug session, attaching to it and using this existing J-Link connection.
RTT Viewer supports all major features of RTT:
- Terminal output on Channel 0
- Sending text input to Channel 0
- Up to 16 virtual Terminals with only one target channel
- Controlling text output: Colored text, erasing the console
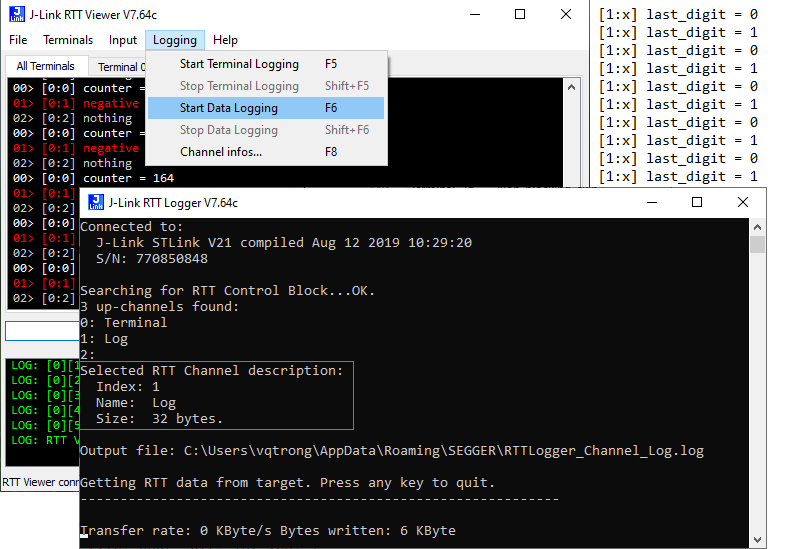
- Logging data on Channel 1
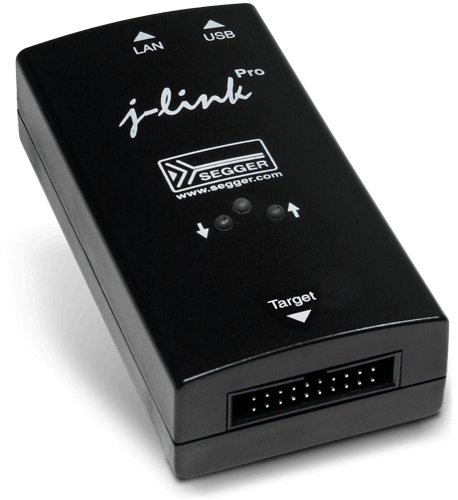
J-Link Probe
Connect any J-Link probe into the SWD interface of the target MCU. Then start the J-Link RTT Viewer in the J-Link software package.
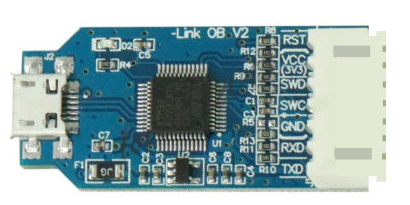
Convert ST-LINK to J-LINK
SEGGER offers a firmware upgrading the ST-LINK on-board on the Nucleo and Discovery Boards to a J-LINK On-Board debugger.
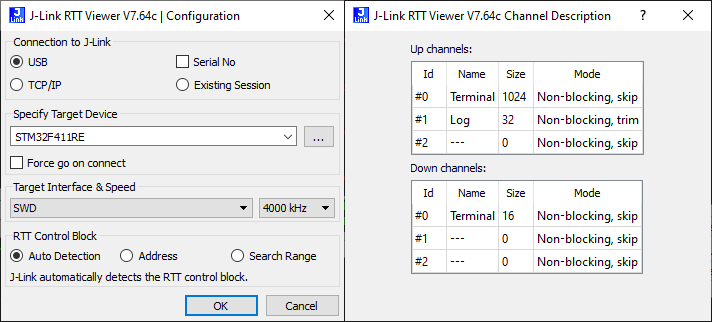
The configuration dialog will show up, select USB mode, and select the Target device from the list of supported devices. Then the viewer will open the Default Channel 0 to display RTT strings.
RTT Viewer can show messages from different virtual terminal in different colors.
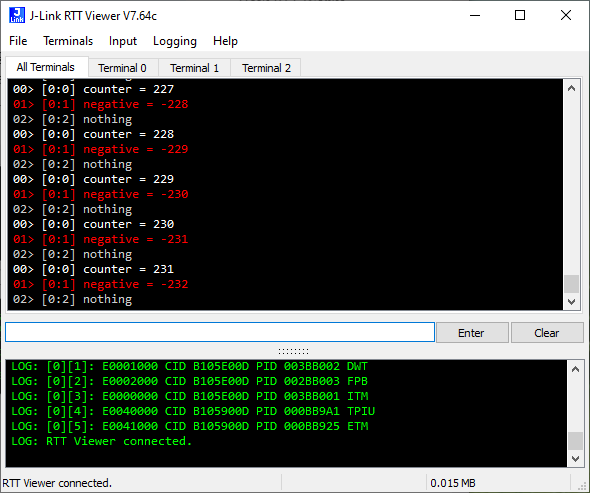
The Channel 1 can be logged in RTT Viewer. However, to log other channel, you have to use RTT Logger.
Override syscalls#
With the same method to redirect standard IO to SWV, UART or Virtual COM, two low-level functions _write() and _read() can be overridden to redirect to RTT.
int _read(int file, char *ptr, int len) {
  *ptr = SEGGER_RTT_WaitKey();
  return 1;
}

int _write(int file, char *ptr, int len) {
  SEGGER_RTT_Write(0, ptr, len);
  return len;
}
Blocking Input
The function SEGGER_RTT_WaitKey() intensionally block the application to read a character. Once a character is available, it is read and this function returns.
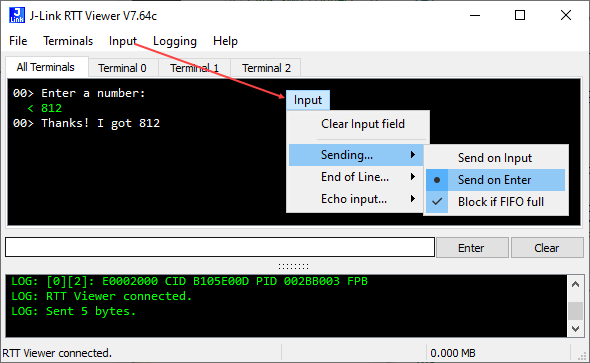
Here is an example of reading a number using RTT redirection:
int main(void)
{
  SEGGER_RTT_Init();
  printf("Enter a number: ");

  int a;
  scanf("%d", &a);

  printf("Thanks! I got %d\n", a);
}
scanf