VueJS - A Javascript framework for building web user interfaces
VueJS is a JavaScript framework for building user interfaces. It builds on top of standard HTML, CSS and JavaScript, and provides a declarative and component-based programming model that helps you efficiently develop user interfaces, be it simple or complex.
Last update: 2022-08-18
Table of Content
Introduction#
Vue (pronounced /vjuː/, like view) is a JavaScript framework for building user interfaces. It builds on top of standard HTML, CSS and JavaScript, and provides a declarative and component-based programming model that helps you efficiently develop user interfaces, be it simple or complex.
The minimal example:
<script type="importmap">
  {
    "imports": {
      "vue": "https://unpkg.com/vue@3/dist/vue.esm-browser.js"
    }
  }
</script>

<div id="app">{{ message }}</div>

<script type="module">
  import { createApp } from 'vue'

  createApp({
    data() {
      return {
        message: 'Hello Vue!'
      }
    }
  }).mount('#app')
</script>
In this example, Vue is used over native EM module. The Vue App is mounted on the element #app, it means Vue will render its components on that element.
What VueJS does?
A VueJS runner created from createApp will change the content of a its root DOM element to what we describle.
The the above example, the div element with the ID app will be renderred with actual data returned from the method data() at the place holder message.
Based on that idea, VueJS levarages the Javascript, and CSS and HTML templates to make more complicated elements, layout, and pages.
Installation#
VueJS uses NodeJS which is an open-source, cross-platform, back-end JavaScript runtime environment that runs on the V8 engine and executes JavaScript code outside a web browser.
Install Node.js
It’s recommended to install a LTS version 15.0 or higher.
- Do not need to install Native packages and compilers
-
To fix the warning
--global,--localare deprecated, open PowerShell as administrator and run:Set-ExecutionPolicy Unrestricted -Scope CurrentUser -Force npm install --global --production npm-windows-upgrade npm-windows-upgrade --npm-version latest
Start Vue
npm init vue@latest
✔ Project name: … <your-project-name>
✔ Add TypeScript? … No / Yes
✔ Add JSX Support? … No / Yes
✔ Add Vue Router for Single Page Application development? … No / Yes
✔ Add Pinia for state management? … No / Yes
✔ Add Vitest for Unit testing? … No / Yes
✔ Add Cypress for both Unit and End-to-End testing? … No / Yes
✔ Add ESLint for code quality? … No / Yes
✔ Add Prettier for code formatting? … No / Yes

Scaffolding project in ./<your-project-name>...
Done.
Then install dependencies and run the project:
cd <your-project-name>
npm install
npm run dev
IDE and Debugger#
Use Visual Studio Code with Volar extensions:
- Volar for Vue 3 and TypeScript
Use Vue Devtools extension on browsers to see details of Vue components at runtime:
Essential Terms#
Here are the core terms of VueJS:
Application#
- A Vue Application instance is created using
createAppfunction. - An application needs to be mounted to a Root Components which is an actual DOM element or a selector string
- The Root Component contains a template for Vue app to render the content. Vue will automatically use the container’s
innerHTMLas the template if the root component does not already have atemplateoption. - It is able to run Multiple Application instances: create and mount on different Root Components
import { createApp } from 'vue'

const app1 = createApp({
  /* ... */
})
app1.mount('#container-1')

const app2 = createApp({
  /* ... */
})
app2.mount('#container-2')
API#
A Vue components using an HTML-like file format called Single-File Component (also known as *.vue files, abbreviated as SFC). A Vue SFC, as the name suggests, encapsulates the component’s logic (JavaScript), template (HTML), and styles (CSS) in a single file. Here’s the previous example, written in SFC format.
Two different API styles, Options API and Composition API, can be used in a Vue Component:
Options API
With Options API, we define a component’s logic using an object of options such as data, methods, and mounted. Properties defined by options are exposed on this inside functions, which points to the component instance:
<script>
export default {
  // Properties returned from data() become reactive state
  // and will be exposed on `this`.
  data() {
    return {
      count: 0
    }
  },

  // Methods are functions that mutate state and trigger updates.
  // They can be bound as event listeners in templates.
  methods: {
    increment() {
      this.count++
    }
  },

  // Lifecycle hooks are called at different stages
  // of a component's lifecycle.
  // This function will be called when the component is mounted.
  mounted() {
    console.log(`The initial count is ${this.count}.`)
  }
}
</script>

<template>
  <button @click="increment">Count is: {{ count }}</button>
</template>
Composition API
With Composition API, we define a component’s logic using imported API functions.
Here is the same component, with the exact same template, but using Composition API and <script setup> instead:
<script setup>
import { ref, onMounted } from 'vue'

// reactive state
const count = ref(0)

// functions that mutate state and trigger updates
function increment() {
  count.value++;
}

// lifecycle hooks
onMounted(() => {
  console.log(`The initial count is ${count.value}.`)
})
</script>

<template>
  <button @click="increment">Count is: {{ count }}</button>
</template>
Which to Choose?
Both API styles are fully capable of covering common use cases. They are different interfaces powered by the exact same underlying system. In fact, the Options API is implemented on top of the Composition API!
If you are new to Vue, here’s our general recommendation:
-
For learning purposes, go with the style that looks easier to understand to you. Again, most of the core concepts are shared between the two styles. You can always pick up the other style later.
-
For production use:
-
Go with Options API if you are not using build tools, or plan to use Vue primarily in low-complexity scenarios, e.g. progressive enhancement.
-
Go with Composition API + Single-File Components if you plan to build full applications with Vue.
-
Template#
Vue uses an HTML-based template syntax that allows you to declaratively bind the rendered DOM to the underlying component instance’s data.
Text#
The content will be updated whenever text is changed.
<p>Using text interpolation: {{ text }}</p>
To process HTML, it must be used with v-html directive, unless it is displayed as plain text.
<p>Using v-html directive: <span v-html="rawHtml"></span></p>
Directives#
The full syntax is:
<div [directive]:[attribute]="expression" />
or in shorthand syntax:
<div [:@][attribute]="expression" />
Whenever the expression value is change, the attribute value will be updated.
Read the details of different directives.
Boolean attributes are attributes that can indicate true / false values by its presence on an element.
<button :disabled="isButtonDisabled">Button</button>
- if
isButtonDisabledis true or empty,disabledwill be included - if
isButtonDisabledis false,disabledwill be omitted.
If you have a JavaScript object representing multiple attributes that looks like this:
data() {
  return {
    objectOfAttrs: {
      id: 'container',
      class: 'wrapper'
    }
  }
}
<div v-bind="objectOfAttrs" />
This will be rendered as:
<div id="container" class="wrapper" />
Expressions#
In Vue templates, JavaScript expressions can be used in the following positions:
- Inside text interpolations (mustaches)
- In the attribute value of any Vue directives (special attributes that start with
v-)
{{ number + 1 }}

{{ ok ? 'YES' : 'NO' }}

{{ message.split('').reverse().join('') }}

<div :id="`list-${id}`"></div>

<span :title="toTitleDate(date)">
  {{ formatDate(date) }}
</span>
One single expression only
Each binding can only contain one single expression. An expression is a piece of code that can evaluate to a value. A simple check is whether it can be used after return.
Binding expression call
Functions called inside binding expressions will be called every time the component updates, so they should not have any side effects, such as changing data or triggering asynchronous operations.
Reactive State#
Using a Reactive element means when even that element is changed, it will notify the engine to re-evaluate all expressions which use that element.
<script setup>
import { reactive } from 'vue'

const state = reactive({ count: 0 })

function increment() {
  state.count++
}
</script>

<template>
  <button @click="increment">
    {{ state.count }}
  </button>
</template>
In Vue, state is deeply reactive by default. This means you can expect changes to be detected even when you mutate nested objects or arrays:
<script setup>
import { reactive } from 'vue'

const obj = reactive({
  nested: { count: 0 },
  arr: ['foo', 'bar']
})

function mutateDeeply() {
  // these will work as expected.
  obj.nested.count++
  obj.arr.push('baz')
}
</script>
Reactive proxy vs Original object
It is important to note that the returned value from reactive() is a Proxy of the original object, which is not equal to the original object.
Only the proxy is reactive - mutating the original object will not trigger updates.
const raw = {}
const proxy = reactive(raw)

// proxy is NOT equal to the original.
console.log(proxy === raw) // false
Limitations of Reactive
-
It only works for object types (
objects,arrays, and collection types such asMapandSet). It cannot hold primitive types such asstring,numberorboolean. -
It’s easy to loose the reactive effect.
const state = reactive({ count: 0 })

let n = state.count; // n is disconnected from state.count
n++; // does not affect original state

let { count } = state; // count is also disconnected from state.count
count++; // does not affect original state

// the function receives a plain number and
// won't be able to track changes to state.count
callSomeFunction(state.count);
Reactive Reference#
To address the limitations of reactive(), Vue also provides a ref() function which allows us to create reactive reference that can hold any value type. ref() takes the argument and returns it wrapped within a ref object with a reactive .value property:
import { ref } from 'vue'

const count = ref(0);
console.log(count); // { value: 0 }
console.log(count.value); // 0
Refs can also be passed into functions or destructured from plain objects without losing reactivity:
const obj = {
  foo: ref(1),
  bar: ref(2)
}

// the function receives a ref
// it needs to access the value via .value
// but it will retain the reactivity connection
callSomeFunction(obj.foo)

// still reactive
const { foo, bar } = obj
Computed vs Methods#
Let’s get the value of an array:
const author = reactive({
  name: 'John Doe',
  books: [
    'Vue 2 - Advanced Guide',
    'Vue 3 - Basic Guide',
    'Vue 4 - The Mystery'
  ]
})
using Method:
function calculateBooksMessage() {
  return author.books.length > 0 ? 'Yes' : 'No'
}
<p>{{ calculateBooksMessage() }}</p>
The method is called once when the template is rendered. Whenever author.books is updated, we have to call the method again to get updated result.
using Computed:
const publishedBooksMessage = computed(() => {
  return author.books.length > 0 ? 'Yes' : 'No'
})
<p>{{ publishedBooksMessage }}</p>
A computed property automatically tracks its reactive dependencies. Vue is aware that the computation of publishedBooksMessage depends on author.books, so it will update any bindings that depend on publishedBooksMessage when author.books changes.
Computed properties are cached based on their reactive dependencies. A computed property will only re-evaluate when some of its reactive dependencies have changed. This means as long as author.books has not changed, multiple access to publishedBooksMessage will immediately return the previously computed result without having to run the getter function again.
Computed Getters & Settter
Getter: Computed properties are by default getter-only!
-
It is important to remember that computed getter functions should only perform pure computation and be free of side effects.
-
Don’t make async requests or mutate the DOM inside a computed getter!
-
The returned value from a computed property is derived state. Think of it as a temporary snapshot - every time the source state changes, a new snapshot is created.
Setter: Exclusively define getter and setter methods:
<script setup>
import { ref, computed } from 'vue'

const firstName = ref('John')
const lastName = ref('Doe')

const fullName = computed({
// getter
get() {
    return firstName.value + ' ' + lastName.value
},
// setter
set(newValue) {
    // Note: we are using destructuring assignment syntax here.
    [firstName.value, lastName.value] = newValue.split(' ')
}
})
</script>
Directive Rendering#
Class#
<script setup>
// reactive variables
const isActive = ref(true)
const hasError = ref(false)
const error = ref(null)

// reactive computed
const classObject = computed(() => ({
  active: isActive.value && !error.value,
  'text-danger': error.value && error.value.type === 'fatal'
}))

const activeClass = ref('active')
const errorClass = ref('text-danger')
</script>

<template>
    <!-- use object -->
    <div
        class="static"
        :class="{ active: isActive, 'text-danger': hasError }"
    />

    <!-- use object from computed -->
    <div :class="classObject" />

    <!-- use array -->
    <div :class="[{ active: isActive }, errorClass]" />
</template>
Style#
<script setup>
// reactive variable
const activeColor = ref('red')
const fontSize = ref(30)

// reactive object
const styleObject = reactive({
  color: 'red',
  fontSize: '13px'
})

// reactive computed
const styleObject = computed(() => ({
  color: isActive.value && !error.value ? 'red' : 'green',
  fontSize: error.value && error.value.type === 'fatal' ? '30px' : '20px'
}))
</script>

<template>
<div :style="{ 'font-size': fontSize + 'px' }" />
<div :style="styleObject" />
</template>
Conditional#
Rendering
The element is rendered or removed based on conditions:
<div v-if="type === 'A'">
  A
</div>
<div v-else-if="type === 'B'">
  B
</div>
<div v-else-if="type === 'C'">
  C
</div>
<div v-else>
  Not A/B/C
</div>
v-if is “real” conditional rendering because it ensures that event listeners and child components inside the conditional block are properly destroyed and re-created during toggles.
Visibility
The element is included but shown or hidden based on conditions:
<h1 v-show="ok">Hello!</h1>
v-show only toggles the display CSS property of the element. So prefer v-show if you need to toggle something very often, and prefer v-if if the condition is unlikely to change at runtime.
List#
Array:
We can use the v-for directive to render a list of items based on an array.
The v-for directive requires a special syntax in the form of item in items, where items is the source data array and item is an alias for the array element being iterated on:
const items = ref([{ message: 'Foo' }, { message: 'Bar' }])
<!-- use alias -->
<li v-for="(item, index) in items">
  {{ index }} - {{ item.message }}
</li>
<!-- use object destruction and alias -->
<li v-for="({ message }, index) in items">
  {{ message }} {{ index }}
</li>
Object:
You can also use v-for to iterate through the properties of an object.
const myObject = reactive({
  title: 'How to do lists in Vue',
  author: 'Jane Doe',
  publishedAt: '2016-04-10'
})
<ul>
    <li v-for="(value, key, index) in myObject">
        {{ index }}. {{ key }}: {{ value }}
    </li>
</ul>
Component:
You can directly use v-for on a component, like any normal element and don’t forget to provide a key:
<MyComponent
  v-for="(item, index) in items"
  :item="item"
  :index="index"
  :key="item.id"
/>
Condition on list item
When they exist on the same node, v-if has a higher priority than v-for. That means the v-if condition will not have access to variables from the scope of the v-for.
<li v-for="todo in todos" v-if="!todo.isComplete">
    {{ todo.name }}
</li>
<div v-for="todo in todos">
    <li v-if="!todo.isComplete">
        {{ todo.name }}
    </li>
</div>
Filtered/Sorted data
Sometimes we want to display a filtered or sorted version of an array without actually mutating or resetting the original data. In this case, you can create a computed property that returns the filtered or sorted array.
const numbers = ref([1, 2, 3, 4, 5])

const evenNumbers = computed(() => {
    return numbers.value.filter((n) => n % 2 === 0)
})
<ul>
    <li v-for="n in evenNumbers">{{ n }}</li>
</ul>
Be careful with reverse() and sort() in a computed property! These two methods will mutate the original array, which should be avoided in computed getters. Create a copy of the original array before calling these methods:
- return numbers.reverse()
+ return [...numbers].reverse()
Event#
Inline Handlers:
const count = ref(0)
const name = ref('Vue.js')
<button @click="count++">Add 1</button>
<p>Count is: {{ count }}</p>
Method Handlers:
const name = ref('Vue.js')

function greet(event) {
  alert(`Hello ${name.value}!`)
}

function say(message) {
  alert(message)
}

function warn(message, event) {
  // now we have access to the native event
  if (event) {
    event.preventDefault()
  }
  alert(message)
}
<!-- use method name, without explicit argument; default argument is used -->
<button @click="greet">Greet</button>

<!-- using method with argument -->
<button @click="say('hello')">Say hello</button>

<!-- using $event special variable -->
<button @click="warn('Form cannot be submitted yet.', $event)">
  Submit
</button>

<!-- using inline arrow function -->
<button @click="(event) => warn('Form cannot be submitted yet.', event)">
  Submit
</button>
Model#
When dealing with forms on the frontend, we often need to sync the state of form input elements with corresponding state in JavaScript.
The v-model directive helps us to bind data input with reactive variable:
<!-- Text -->
<input v-model="message" placeholder="edit me" />

<!-- Text Area -->
<textarea v-model="message" placeholder="add multiple lines"></textarea>

<!-- Checkbox -->
<input type="checkbox" id="checkbox" v-model="checked" />
<label for="checkbox">{{ checked }}</label>

<!-- Radio selector -->
<input type="radio" id="one" value="One" v-model="picked" />
<label for="one">One</label>

<input type="radio" id="two" value="Two" v-model="picked" />
<label for="two">Two</label>


<!-- Dropdown -->
<select v-model="selected">
  <option disabled value="">Please select one</option>
  <option>A</option>
  <option>B</option>
  <option>C</option>
</select>

<select v-model="selected" multiple>
  <option>A</option>
  <option>B</option>
  <option>C</option>
</select>
Lifecycle Hooks#
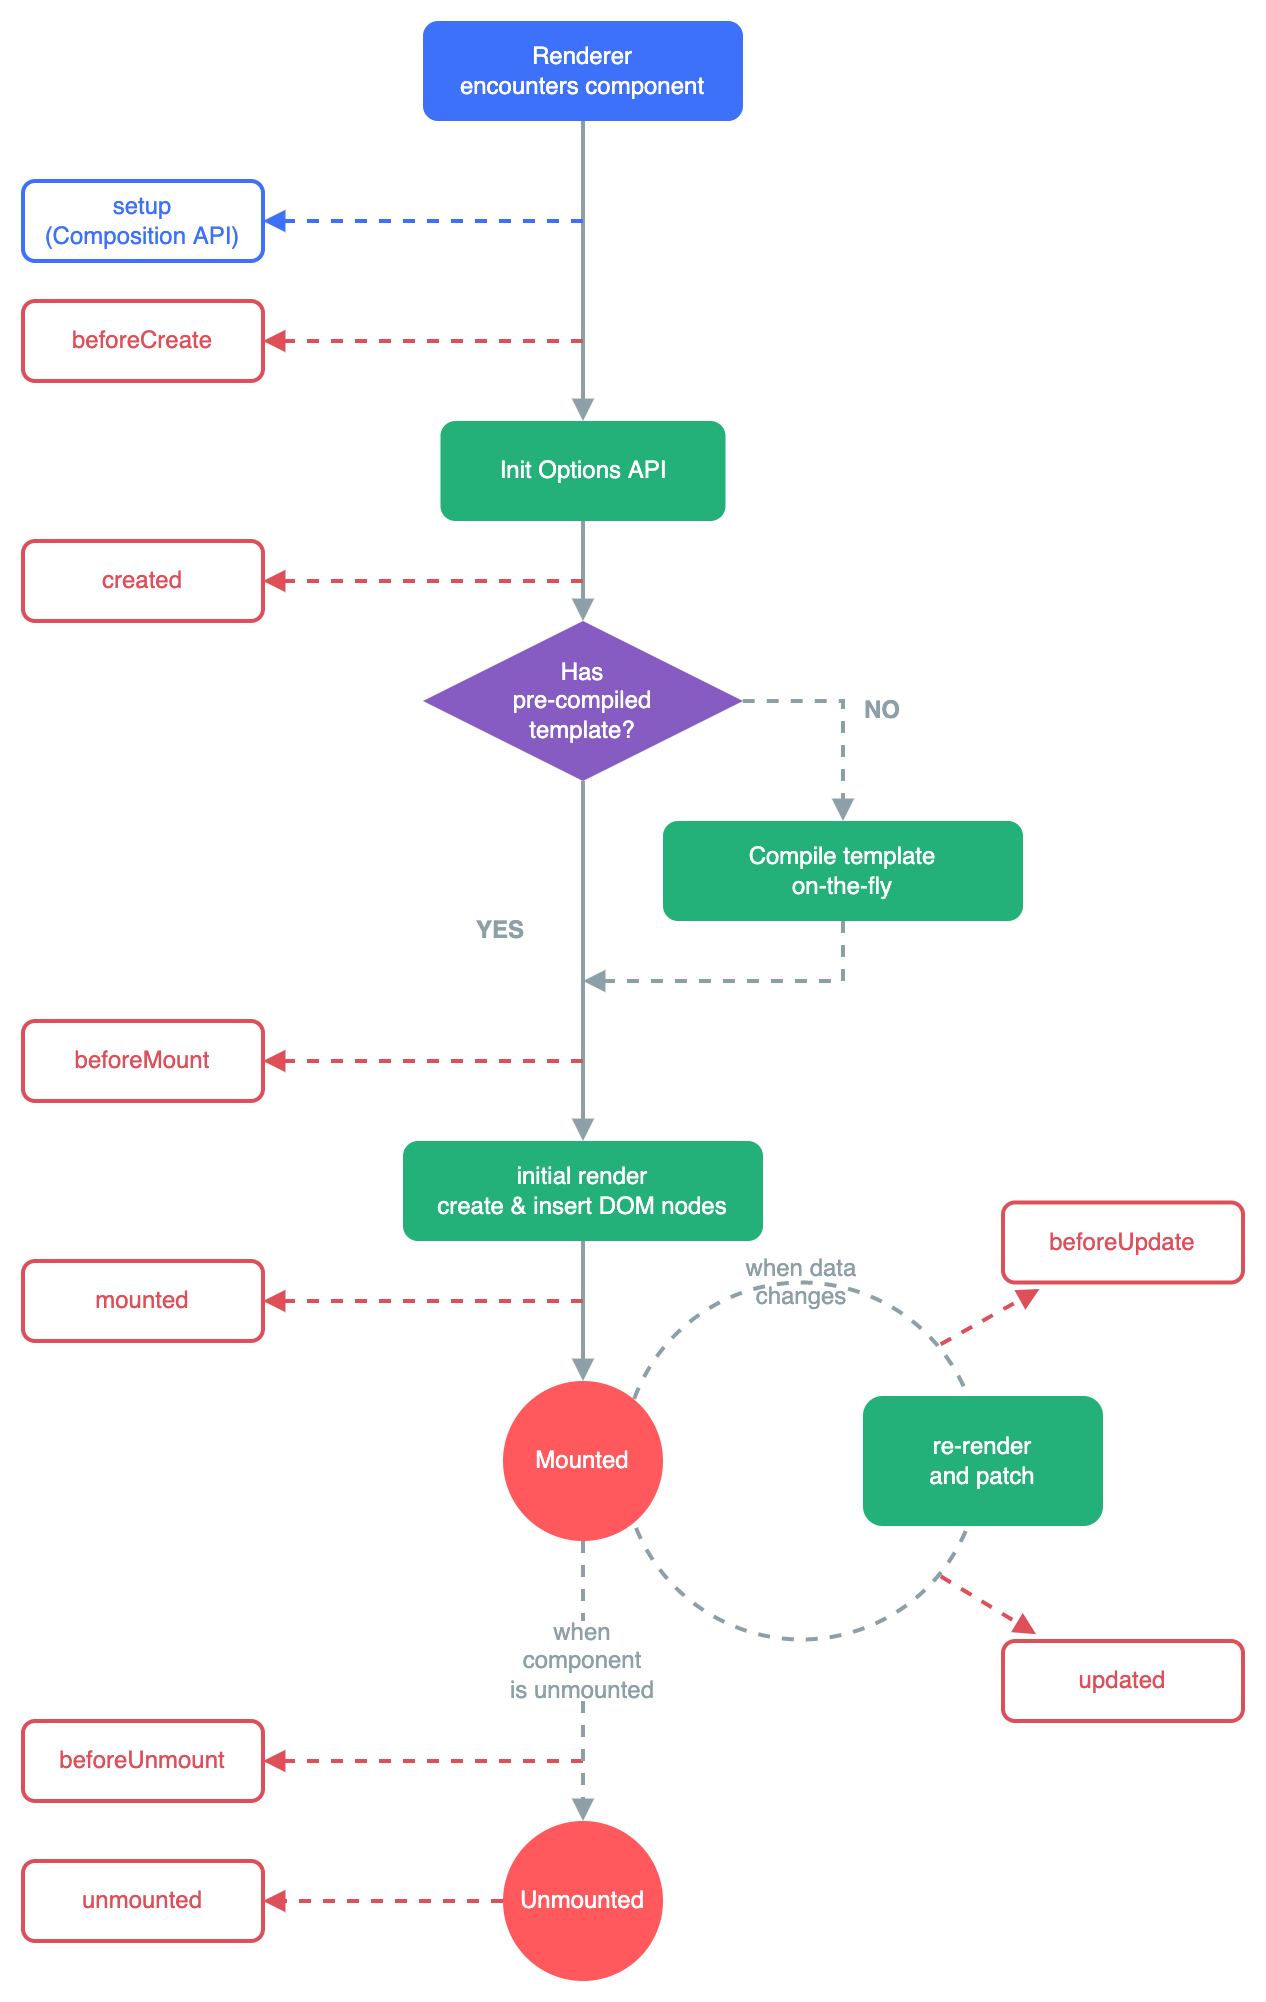
For example: onMounted hook can be used to run code after the component has finished the initial rendering and created the DOM nodes.
<script setup>
    import { onMounted } from 'vue'

onMounted(() => {
    console.log(`the component is now mounted.`)
})
There are also other hooks which will be called at different stages of the instance’s lifecycle, with the most commonly used being onMounted, onUpdated, and onUnmounted.
Watcher#
We can use the watch function to trigger a callback whenever a piece of reactive state changes.
Watch Reactive Object
<script setup>
import { ref, reactive, watch } from 'vue'

const x = ref(0)
const obj = reactive({ count: 0 })

// reference
watch(x, (newX) => {
  console.log(`x is ${newX}`)
})

// getter of reactive
watch(
  () => obj.count,
  (count) => {
    console.log(`count is: ${count}`)
  }
)
</script>
Watch and Do something
watchEffect() allows us to perform a side effect immediately while automatically tracking the effect’s reactive dependencies.
<script setup>
const url = ref('https://...')
const data = ref(null)

watchEffect(async () => {
  const response = await fetch(url.value)
  data.value = await response.json()
})
</script>
Here, the callback will run immediately. During its execution, it will also automatically track url.value as a dependency (similar to computed properties). Whenever url.value changes, the callback will be run again.
watch vs. watchEffect
watch and watchEffect both allow us to reactively perform side effects. Their main difference is the way they track their reactive dependencies:
-
watchonly tracks the explicitly watched source. It won’t track anything accessed inside the callback. In addition, the callback only triggers when the source has actually changed. watch separates dependency tracking from the side effect, giving us more precise control over when the callback should fire. -
watchEffect, on the other hand, combines dependency tracking and side effect into one phase. It automatically tracks every reactive property accessed during its synchronous execution. This is more convenient and typically results in terser code, but makes its reactive dependencies less explicit.
Callback Flush Timing
By default, user-created watcher callbacks are called before Vue component updates. This means if you attempt to access the DOM inside a watcher callback, the DOM will be in the state before Vue has applied any updates.
If you want to access the DOM in a watcher callback after Vue has updated it, you need to specify the flush: ‘post’ option:
watch(source, callback, {
  flush: 'post'
})

watchEffect(callback, {
  flush: 'post'
})

watchPostEffect(() => {
  /* executed after Vue updates */
})
Stopping a Watcher
Watchers declared synchronously inside setup() or <script setup> are bound to the owner component instance, and will be automatically stopped when the owner component is unmounted. In most cases, you don’t need to worry about stopping the watcher yourself.
To manually stop a watcher, use the returned handle function. This works for both watch and watchEffect:
const unwatch = watchEffect(() => {})

// ...later, when no longer needed
unwatch()
Note that there should be very few cases where you need to create watchers asynchronously, and synchronous creation should be preferred whenever possible. If you need to wait for some async data, you can make your watch logic conditional instead:
// data to be loaded asynchronously
const data = ref(null)

watchEffect(() => {
  if (data.value) {
    // do something when data is loaded
  }
})
Component#
Components allow us to split the UI into independent and reusable pieces, and think about each piece in isolation. It’s common for an app to be organized into a tree of nested components.
Defining a Component in a Single-File Component to pack script, template, and style:
<script setup>
import { ref } from 'vue'

const count = ref(0)
</script>

<template>
  <button @click="count++">You clicked me {{ count }} times.</button>
</template>
Then use it an a parent component:
<script setup>
import ButtonCounter from './ButtonCounter.vue'
</script>

<template>
  <h1>Here is a child component!</h1>
  <ButtonCounter />
  <ButtonCounter />
  <ButtonCounter />
</template>
Properties#
We send data to children components through Properties:
<script setup>
const props = defineProps({
  characters: { type: Array<String>, required: true },
  initValue: { type: String, require: true, default: '' }
})
</script>

<template>
    <li v-for="char in props.characters"> {{ char }} </li>
    <div>{{ props.initValue }}</div>
</template>
<script setup>
import Child from './Child.vue'
</script>

<template>
  <Child :characters="['A', 'B', 'C']" :initValue='Hello'/>
</template>
One-Way Data Flow
All props form a one-way-down binding between the child property and the parent one: when the parent property updates, it will flow down to the child, but not the other way around. This prevents child components from accidentally mutating the parent’s state, which can make your app’s data flow harder to understand.
In addition, every time the parent component is updated, all props in the child component will be refreshed with the latest value.
React to props changed
-
Initial value: Child uses the prop value as an initial value, then it is disconnected from feature prop updates
const props = defineProps(['initialCounter']); const counter = ref(props.initialCounter); // not change when initialCounter is updated -
Reactive computed: A reactive computed can watch for prop changes
const props = defineProps(['size']);
const normalizedSize = computed(() => props.size.trim().toLowerCase()); // props.size is watched
Events#
A component can emit custom events directly in template expressions (e.g. in a v-on handler) using the built-in $emit method:
<button @click="$emit('someEvent')">click me</button>
<button @click="$emit('increaseBy', 1)">
  Increase by 1
</button>
<script>
function increaseCount(n) {
    count.value += n
}
</script>
<MyButton @some-event="callback" />
<MyButton @increase-by="(n) => count += n" />
<MyButton @increase-by="increaseCount" />
Emitted events can be explicitly declared on the component via the defineEmits() macro:
<script setup>
const emit = defineEmits([
    'inFocus',
    'submit'
])

function buttonClick() {
  emit('submit')
}
</script>
Emiter can be an object to use object method to validate arguments:
<script setup>
const emit = defineEmits({
  // No validation
  click: null,

  // Validate submit event
  submit: ({ email, password }) => {
    if (email && password) {
      return true
    } else {
      console.warn('Invalid submit event payload!')
      return false
    }
  }
})

function submitForm(email, password) {
  emit('submit', { email, password })
}
</script>
Slot#
Likely HTML tags, Component can have its content placeholder using <slot>:
<button class="fancy-btn">
  <slot><!-- slot outlet -->
    Default content!
  </slot>
  <slot name="footer"><!-- named slot-->
    Default content!
  </slot>
</button>
<FancyButton>
  Click me! <!-- slot content -->
  <template #footer>
    Footer content
  </template>
</FancyButton>
Render scope
Slot content does not have access to the child component’s data.
Everything in the parent template is compiled in parent scope; everything in the child template is compiled in the child scope.