Introduction of Yocto Project
The Yocto Project (YP) is an open source collaboration project that helps developers create custom Linux-based systems regardless of the hardware architecture. The project provides a flexible set of tools, definitions and configurations (called stacks), and steps to build a customized Linux images.
Last update: 2022-05-07
Table of Content
Embedded System#
An embedded system running with an OS need 4 main parts:
-
Toolchain: The compiler and other tools needed to create a system or an application on your target system.
-
Bootloader: The program that initializes the board and loads the Kernel.
-
Kernel: This is the heart of the system, managing system resources and interfacing with hardware.
-
Root filesystem: Contains the libraries and programs that are run once the kernel has completed its initialization.
Yocto Project#
The Yocto Project (YP) is an open source collaboration project that helps developers create custom Linux-based systems regardless of the hardware architecture.
The project provides a flexible set of tools, definitions and configurations (called stacks), and steps to build a customized Linux images.
Refer to a full version of Yocto Documents to learn more.
Input
Set of data that describes what we want, that is our specification, including Kernel Configuration, Hardware Name, Packages/Binaries to be installed
Output
Linux Based Embedded Product, such as Linux Kernel, Root File System, Bootloader, Device Tree, Toolchain
Advantages of Yocto Project:
-
Widely Adopted Across the Industry:
-
Support multiple architectures: from Intel, ARM, MIPS, PPC, etc., Chip vendors create and supply BSPs that support their hardware
-
Images and Code Transfer Easily: just update configuration, and keep all other stacks
-
Flexibility: Through customization and layering, a project group can leverage the base Linux distribution to create a distribution that works for their product needs.
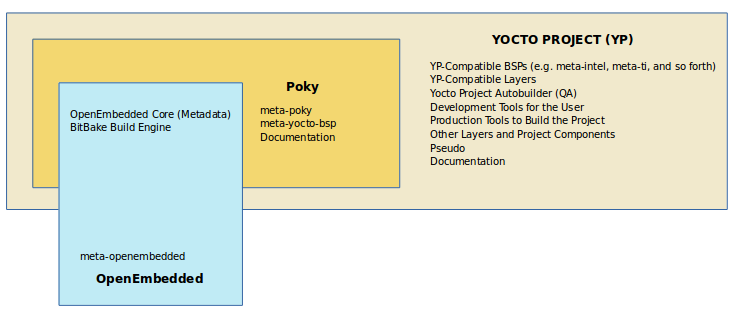
Poky Repo#
Poky is a reference distribution of the Yocto Project®. It contains the OpenEmbedded Build System (Bitbake and OpenEmbedded Core) as well as a set of metadata to get you started building your own distro.
To use the Yocto Project tools, you can download Poky and use it to bootstrap your own distribution. Note that Poky does not contain binary files – it is a working example of how to build your own custom Linux distribution from source.
OpenEmbedded Core#
OpenEmbedded offers a best-in-class cross-compile environment. It allows developers to create a complete Linux Distribution for embedded systems.
The Yocto Project and OpenEmbedded share a core collection of metadata called OpenEmbedded-Core(oe-core).
-
The Yocto Project focuses on providing powerful, easy-to-use, interoperable, well-tested tools, metadata, and board support packages (BSPs) for a core set of architectures and specific boards.
-
OpenEmbedded only provides a comprehensive set of metadata for a wide variety of architectures, features, and applications
Terminology#
Metadata#
Metadata is collection of:
- Recipes (.bb and .bbappend)
- Configuration files (.conf)
- Classes (.bbclass)
- Includes (.inc)
Recipes#
A recipe is a set of instructions that is read and processed by the bitbake.
Extension: .bb
A recipe describes:
- where you get source code
- which patches to apply
- Configuration options
- Compile options (library dependencies)
- Install
- License
Configuration Files#
They tell the build system what to build and put into the image to support a particular platform
Extension: .conf
Files which hold:
- global definition of variables
- user defined variables and
- hardware configuration information
Types:
- Machine Configuration Options
- Distribution Configuration Options
- Compiler tuning options
- General Common Configuration Options
- User Configuration Options (local.conf)
Classes#
Class files are used to abstract common functionality and share it amongst multiple recipe (.bb) files. To use a class, add inherit <classname> in the recipe file.
Extension: .bbclass
Layers#
A collection of related recipes. Typical naming convention: meta-<layername>.
Layers provide a mechanism to isolate metadata according to functionality, for instance BSPs, distribution configuration, etc.
BBLAYERS variable present in build/conf/bblayers.conf file list the layers Bitbake tries to find.
If bblayers.conf is not present when you start the build, the OpenEmbedded build system creates it from bblayers.conf.sample when you source the oe-init-build-env script.
Command to find out which layers are present:
bitbake-layers show-layers
Where to get other layers:
-
Yocto Project Compatible Layers: https://www.yoctoproject.org/software-overview/layers/
-
OpenEmbedded Layers: https://layers.openembedded.org/layerindex/branch/master/layers/.
Packages#
A package is a binary file with name .rpm, .deb, or *.ipkg. A single recipe may produce many packages. All packages that a recipe generated are listed in the recipe variable.
Image#
An image is the top level recipe, it has a description, a license and inherits the core-image class. Image is architecture agnostic and defines how the root filesystem is built, with what packages.
Command to check the list of available image recipes:
ls meta*/recipes*/images/*.bb
Prerequisites#
-
Host Linux machine
Use a native Linux machine for better performance. A virtual machine can be used also.
Install Ubuntu Server running in VirtualBox
-
Virtual Machine settings:
- At least 4GB RAM, 128 GB HDD (Fixed Disk for better performance)
- Use more processors
- Disable Network to speed up installation
-
Use Ubuntu Live Server image to install
- Enable OpenSSH server for remote access
-
After installation:
- Enable Network for NAT + Host-only in Virtual machine settings
-
Disable Journal features
Boot into Recovery Mode on Ubuntu Grub menu (press
ESCat boot), then selectroottermninal.echo "u" > /proc/sysrq-trigger tune2fs -O ^has_journal /dev/sda2 -
Change mounting option, and use tmpfs for
/tmpsudo nano /etc/fstabUUID=/dev/sda2 / ext4 noatime,barrier=0,commit=6000,errors=remount-ro 0 1 tmpfs /tmp tmpfs rw,noatime,nosuid,nodev 0 0 /swap.img none swap sw 0 0 -
Set up system:
-
Add current user to the sudoers:
sudo bash -c "echo '$USER ALL=(ALL) NOPASSWD: ALL' > /etc/sudoers.d/$USER" -
Disable unattended upgrades
sudo dpkg-reconfigure unattended-upgrades -
Use
ip ato show availabe interface, such asenp0s3andenp0s8 -
Configure Network through Netplan:
sudo nano /etc/netplan/99_config.yamlnetwork: version: 2 ethernets: enp0s3: dhcp4: true enp0s8: dhcp4: truesudo netplan apply -
Install Samba for file sharing
-
-
-
Yocto build packages such as for Ubuntu
sudo apt install \
    gawk wget git diffstat unzip texinfo gcc build-essential chrpath \
    socat cpio python3 python3-pip python3-pexpect xz-utils debianutils \
    iputils-ping python3-git python3-jinja2 libegl1-mesa libsdl1.2-dev \
    pylint3 xterm python3-subunit mesa-common-dev zstd liblz4-tool
Workflow of Yocto Project#
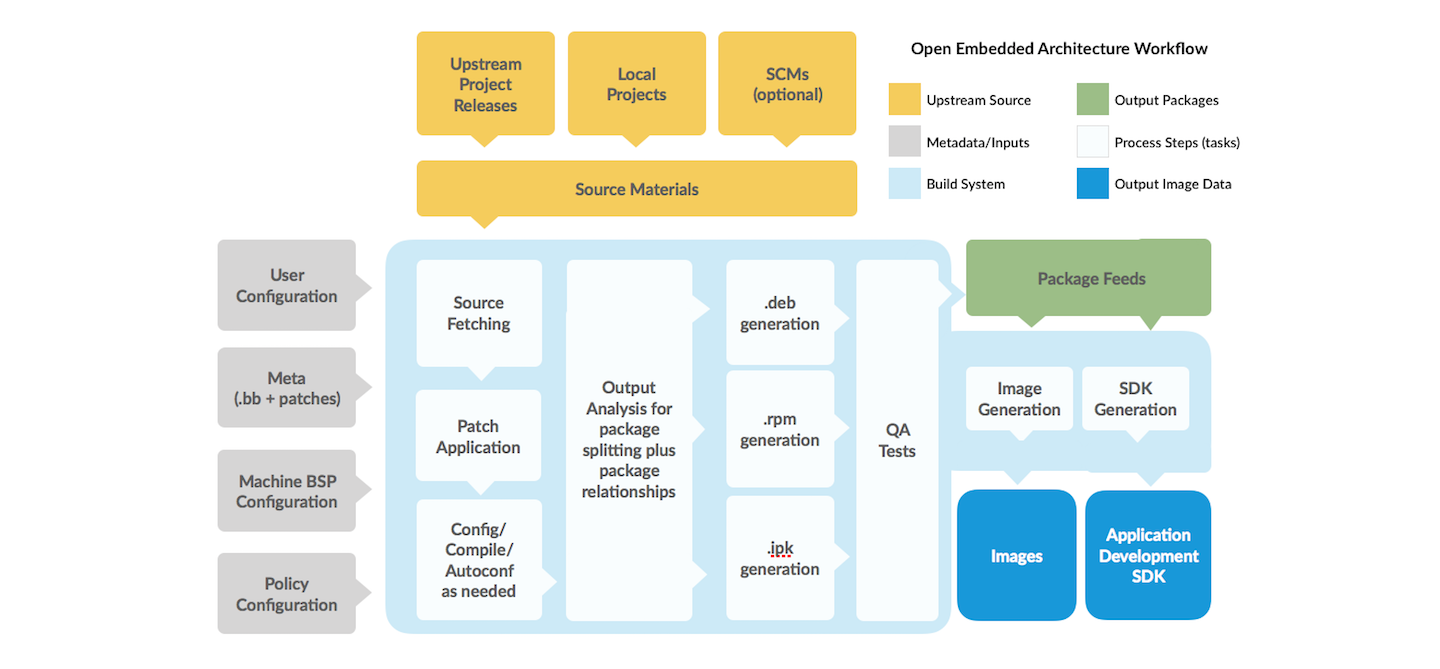
-
Checkout the branch of Poky to use
Check the Release table to see the version and tags.
Note to select the latest branch supported by all layers. For example, on the writing date (Arp 7th 2022), the latest version is Honister (3.4.3), but the latest LTS version is Dunfell (3.1.15) which was released in Arp 2020. So, it is reasonable to use Dunfell for better compatibility.
git clone -b dunfell \
    git://git.yoctoproject.org/poky.git
tree pocky -L 1pocky ├── bitbake ├── contrib ├── documentation ├── LICENSE ├── LICENSE.GPL-2.0-only ├── LICENSE.MIT ├── MEMORIAM ├── meta ├── meta-poky ├── meta-selftest ├── meta-skeleton ├── meta-yocto-bsp ├── oe-init-build-env ├── README.hardware -> meta-yocto-bsp/README.hardware ├── README.OE-Core ├── README.poky -> meta-poky/README.poky ├── README.qemu └── scripts -
Prepare the build environment
Poky provides you a script
oe-init-build-env, which should be used to set up the build environment. You can pass abuild_directoryargument for the name of the directory where the environment is set. In case it is not given, it defaults tobuild.The above script will move you in a build folder and create two files (
local.conf,bblayers.conf) insideconffolder. The defaults are set to build for aqemux86-64.source poky/oe-init-build-env### Shell environment set up for builds. ### You can now run 'bitbake <target>' Common targets are: core-image-minimal core-image-sato meta-toolchain meta-ide-support You can also run generated qemu images with a command like 'runqemu qemux86' Other commonly useful commands are: - 'devtool' and 'recipetool' handle common recipe tasks - 'bitbake-layers' handles common layer tasks - 'oe-pkgdata-util' handles common target package tasksThe config files:
tree confconf ├── bblayers.conf ├── local.conf └── templateconf.cfg -
Check the Metadata and layers
Refer to Bitbake User Manual for more infomation.
Check the build configs:
bitbake <target> -nBuild Configuration: BB_VERSION = "1.46.0" BUILD_SYS = "x86_64-linux" NATIVELSBSTRING = "ubuntu-18.04" TARGET_SYS = "x86_64-poky-linux" MACHINE = "qemux86-64" DISTRO = "poky" DISTRO_VERSION = "3.1.15" TUNE_FEATURES = "m64 core2" TARGET_FPU = "" meta meta-poky meta-yocto-bsp = "dunfell:ab03f130e449fdb24de79b119c73f0969f1bd801" -
Build the target image
Run bitbake with the target image name:
for example:bitbake <target>core-image-minimal: the smallest image allowing a device to boot to check bootloader and kernelcore-image-sato: an X11 Window-system-based image with a SATO theme and a GNOME mobile desktop environment
bitbake core-image-minimalThe first build will take quite long time to complete. Yocto will download source code and compile all components needed to make the target.
Try to run the image:
runqemu core-image-minimaladding
nographicto run without the graphic window
Configurations#
local.conf#
Contains local user settings for almost aspects of the build system,
is generated from meta-pocky/conf/local.conf.sample. local.conf file is a very convenient way to override several default configurations over all the Yocto Project’s tools, but local.conf file is not tracked by source code manager. In general, everything in your local.conf should be moved to your own distro configuration. Finally, you should only set DISTRO to your own distro in local.conf.
MACHINE: The target machine is being built for.- E.g.:
MACHINE = "qemux86-64" IMAGE_FSTYPES: Output image formats are list of different image formats.- These images can be used for different purpose, such as rootfs, raw disk, MTD partition.
E.g.:IMAGE_FSTYPES += "tar.bz2 jffs2 wic" CORE_IMAGE_EXTRA_INSTALLadd extra packages to an image-
This is a convenience variable that enables you to add extra packages to an image based on the
core-imageclass.
E.g.:CORE_IMAGE_EXTRA_INSTALL += "openssh"IMAGE_INSTALL: This is the variable that controls what is included in any image. UseIMAGE_INSTALL_appendonly!\- E.g.:
IMAGE_INSTALL_append = " openssh"note the space
UseIMAGE_INSTALL +=will override theCORE_IMAGE_EXTRA_INSTALLthat can lead to missing packages.
DL_DIR: Where to place downloads-
During a first build the system will download many source code tarballs, from various upstream projects. These are all stored in
DL_DIR. The default is adownloadsdirectory underTOPDIRwhich is the build directory.This download folder can be shared between builds. It also can create tarball files using
BB_GENERATE_MIRROR_TARBALLS = "1"option. You can also pre-fetch source code without running any compilation with--runonly=fetchoption in bitbake.Example to create sharing downloaded package folder:
DL_DIR ?= "${HOME}/yocto-downloads"bitbake <target> --runonly=fetch TMP_DIR: Where to place the build output- This option specifies where the bulk of the building work should be done and where Bitbake should place its temporary files(source extraction, compilation) and output.
BB_NUMBER_THREADS: Determine the number of tasks that Bitbake will perform in parallel- Note: These tasks are related to bitbake and nothing related to compiling. Defaults to the number of CPUs on the system.
PARALLEL_MAKE: Specify the number of processes that GNU make can run in parallel- This specifies the number of processes that GNU make can run in parallel on a compilation task. Defaults to the number of CPUs on the system. Corresponds to the
-jmake option. rm_work: Remove source code and imtermediate files-
Yocto Build System can take a lot of disk space during build. But bitbake provides options to preserve disk space.
You can tell bitbake to delete all the source code, build files after building a particular recipe by adding the following line in
local.conffile:INHERIT += "rm_work"Disadvantage: Difficult to debug while build fails of any recipe.
If you want to exclude bitbake deleting source code of a particular package, you can add it in
RM_WORK_EXCLUDEvariable, for example:RM_WORK_EXCLUDE += "core-image-minimal"
Query a configuration
For example, get BB_NUMBER_THREADS setting of the target core-image-minimal:
bitbake -e core-image-minimal | grep ^BB_NUMBER_THREADS=
bblayers.conf#
The bblayers.conf file tells Bitbake what layers you want considered during the build.
By default, the layers listed in this file include layers minimally needed by the build system. However, you must manually add any custom layers you have created.
BBLAYERS = "\
    /home/vqtrong/poky/meta \
    /home/vqtrong/poky/meta-poky \
    /home/vqtrong/poky/meta-yocto-bsp \
    "
To add/remove a layer, you can use bitbake-layers command, for example:
bitbake-layers add-layer ../meta-openembedded/meta-oe
To show all layers:
bitbake-layers show-layers
Absolute paths in Config files
When you copy project to another path, two files need modified:
build/conf/bblayers.confbuild/tmp/saved_tmpdir
Generated Images#
Top-level image targets:
There are some top-level image targets defined for different purposes, such as:
-
core-image-minimal: A small image just capable of allowing a device to boot. -
core-image-base: A console-only image that fully supports the target device hardware. -
core-image-sato: An image with Sato support, a mobile environment and visual style that works well with mobile devices. The image supports X11 with a Sato theme and applications such as a terminal, editor, file manager, media player, and so forth. -
core-image-weston: A very basic Wayland image with a terminal. This image provides the Wayland protocol libraries and the reference Weston compositor. -
core-image-x11: A very basic X11 image with a terminal.
Component images:
The build process writes component images out to the Build Directory inside the tmp/deploy/images/machine/ folder:
-
kernel-image: A kernel binary file.
TheKERNEL_IMAGETYPEvariable determines the naming scheme for the kernel image file. -
root-filesystem-image: Root filesystem for the target device (e.g. .ext3 or .bz2 files).
TheIMAGE_FSTYPESvariable determines the root filesystem image type -
kernel-modules: Tarballs that contain all the modules built for the kernel. -
bootloaders: If applicable to the target machine, bootloaders supporting the image.
Image formats:
Yocto can generate different image formats, e.g.
tarfile: extract into formatted partition- partition image (e.g.
ext4,jffs2): raw copy to disk or MTD partition - disk image (wic): raw copy to disk