Camera live streaming using HLS/DASH
HLS and DASH protocol are used to stream videos on the internet, replacing the old RTMP protocol. These methods transfer a video in small chunks at different quality levels via standard HTTP web servers. This post shows how to use FFmpeg to generate playlist of video chunks from a camera and provide a live stream from a simple web server running on Apache, NGINX, or Python HTTP. The performance and delay of HLS/DASH streaming are also measured.
Last update: 2022-05-07
Table of Content
Big Buck Bunny movie, © 2008, Blender Foundation
Install FFmpeg#
Install FFmpeg from the package manager:
sudo apt install -y ffmpeg
Or compile an executable file by following Compile FFmpeg manually guide.
HLS vs. MPEG-DASH#
A streaming protocol is a type of technology that is designed to transport video files over the internet. In the past, online video was delivered primarily via the RTMP protocol. RTMP is a Flash-based standard that’s still used today for sending video from an encoder to an online video platform. The RTMP has slowly been replaced by the HLS and MPEG-DASH protocol.
HLS#
HLS is short for HTTP Live Streaming. Originally developed by Apple, the purpose of HLS was to make the iPhone capable of accessing live streams. HLS can play video encoded with the H.264 or HEVC/H.265 codecs.
As the name implies, HLS delivers content via standard HTTP web servers. This means that no special infrastructure is needed to deliver HLS content. Any standard web server or CDN will work. Additionally, content is less likely to be blocked by firewalls with this protocol, which is a plus.
How it works is video is chopped up into 10-second segments. Latency for delivery tends to be in the 45-second range. With some settings applied, the delay can be reduced to 3-5 seconds. This protocol also includes several other built-in features. For example, HLS is an adaptive bit rate protocol. This means that the client device and server dynamically detect the internet speed of the user and adjusts video quality accordingly.
MPEG-DASH#
As a newer standard, MPEG-DASH is an up-and-coming competitor to HLS. This protocol was created as a response to fragmentation in the video streaming market. At the time, Apple’s HLS was competing with several other streaming protocols. The outcome was uncertain, which led standards organizations to develop MPEG-DASH as an alternative, unifying streaming protocol.
MPEG-DASH is an open-source standard. Like the HLS streaming protocol, MPEG-DASH is an adaptive bit rate video method. It also supports advertising, and the technology for this is rapidly advancing. However, MPEG-DASH is not supported on the mobile Safari browser. HLS is simply much more widely compatible than MPEG-DASH.
Setup web server#
Because HLS and MPEG-DASH are HTTP-based protocols, there is no need to install a special web server, what is needed is just a simple web server which can serve video chunk files.
Apache#
Apache is a popular web server application which can be installed on the Raspberry Pi to allow it to serve web pages. On its own, Apache can serve HTML files over HTTP, and with additional modules can serve dynamic web pages using scripting languages such as PHP.
Apache’s design architecture:
- Process Driven Approach
- Creates a new thread for each request.
sudo apt install -y apache2
By default, Apache puts a test HTML file in the web folder /var/www/html/. This default web page is served at http://localhost, or on the Pi itself IP address.
NGINX#
NGINX (pronounced engine x) is a popular lightweight web server application which can be installed on the Raspberry Pi to allow it to serve web pages. Like Apache, NGINX can serve HTML files over HTTP, and with additional modules can serve dynamic web pages using scripting languages such as PHP.
NGINX’s design architecture:
- Event-Driven approach
- Handles multiple requests within one thread
Nginx can work very fast and wide with limited resources.
sudo apt install -y nginx
Similar to Apache, NGINX also serves web pages in /var/www/html/. Go to http://localhost/etc/nginx/sites-available to see the site’s links.
As the article Apache Vs NGINX — Which Is The Best Web Server?mentioned, it should go with NGINX if serving static web page with a high traffic (requests).
Stream live video#
MPEG-DASH and HLS both create playlist files whose content are list of video chunks. ffmpeg can read from camera and write video chunks as well as update the playlist.
To speed up and to protect SD Card, it is better to write video chunks to RAM memory. When the number of chunks go high, clear the old ones to get more space.
Let’s do it with HLS first!
Create video chunks#
Create a new folder in shared memory:
mkdir -p /dev/shm/hls
and make a soft-link to the web folder:
ln -s /dev/shm/hls /var/www/html/hls
Use ffmpeg to create HLS playlist:
-input_format h264 -i /dev/video0: input from/dev/video0(Pi Camera) with V4L2 H264 format (see more in V4L2 H264 direct copy)-c:v copy: directly use H264 video from V4L2 driver-f hls: output in HLS format-hls_time 1: video chunks are saved in 1-second segments-hls_list_size 30: playlist has 30 segments-hls_flags delete_segments: delete segments not in the playlist/dev/shm/hls/live.m3u8: the location of playlist file and video segments
ffmpeg -y \
    -input_format h264 -i /dev/video0 \
    -c:v copy \
    -f hls \
    -hls_time 1 \
    -hls_list_size 30 \
    -hls_flags delete_segments \
    /dev/shm/hls/live.m3u8
Use HLS streaming#
A JavaScript named hls.js will be used to play HLS stream.
<!DOCTYPE html>
<html>
    <head>
        <meta charset="utf-8" />
        <title>HLS Live Stream</title>
    </head>
    <body>
        <h1>HLS Live Stream</h1>
        <script src="hls.js"></script>
        <video id="video" controls autoplay></video>
        <script>
            var video = document.getElementById("video");
            var videoSrc = "hls/live.m3u8";
            // First check for native browser HLS support
            if (video.canPlayType("application/vnd.apple.mpegurl")) {
                video.src = videoSrc;
            }
            // If no native HLS support, check if hls.js is supported
            else if (Hls.isSupported()) {
                var hls = new Hls();
                hls.loadSource(videoSrc);
                hls.attachMedia(video);
            }
        </script>
    </body>
</html>
HLS Performance
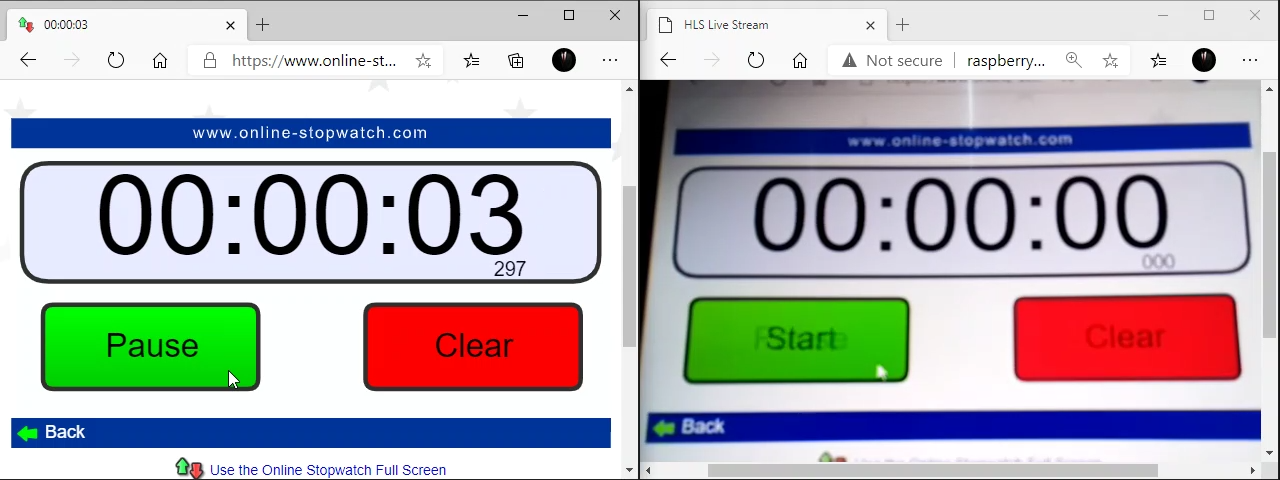
HLS is good to stream over HTTP but it has big delay. At the resolution 1024x768 @ 30fps, 1-second segments, it still shows a delay of ~10 seconds.
HLS testing site https://hls-js.netlify.app/demo can measure the performance of a HLS playlist. If testing a local server, it needs to enable CORS in server settings or use CORS unblock extension.
Use MPEG-DASH streaming#
DASH is the same as HLS, the difference is in the playlist format and the container of segments.
Create a new folder in shared memory:
mkdir -p /dev/shm/dash
and make a soft-link to the web folder:
ln -s /dev/shm/dash /var/www/html/dash
Use ffmpeg to create DASH playlist:
-f dash: DASH format-seg_duration 1: segment size is 1-second-streaming 1: streaming enabled-window_size 30 -remove_at_exit 1: playlist has 30 chunks, delete chunks when exit/dev/shm/dash/live.mpd: playlist file
ffmpeg -y \
    -input_format h264 \
    -i /dev/video0 \
    -c:v copy \
    -f dash \
    -seg_duration 1 \
    -streaming 1 \
    -window_size 30 -remove_at_exit 1 \
    /dev/shm/dash/live.mpd
And finally, change to Dash.js to play DASH stream:
<!DOCTYPE html>
<html>
    <head>
        <meta charset="utf-8" />
        <title>MPEG-DASH Live Stream</title>
    </head>
    <body>
        <h1>MPEG-DASH Live Stream</h1>
        <script src="dash.all.min.js"></script>
        <video id="videoPlayer" controls></video>
        <script>
            (function () {
                var url = "dash/live.mpd";
                var player = dashjs.MediaPlayer().create();
                player.initialize(
                    document.querySelector("#videoPlayer"),
                    url,
                    true
                );
                player.updateSettings({
                    streaming: {
                        lowLatencyEnabled: true,
                        liveDelay: 2,
                        liveCatchup: {
                            minDrift: 0.05,
                            playbackRate: 1,
                            latencyThreshold: 30,
                        },
                    },
                });
            })();
        </script>
    </body>
</html>
MPEG-DASH Performance
MPEG-DASH can achieve ~3 seconds of delay, which is much better than HLS. However, it is still far from real-time live stream.
Low latency
HLS and MPEG-DASH support Low Latency streaming, but need configured in server and encoder. This topic will be covered later.
Python Web Server#
Python HTTP server http.server.SimpleHTTPRequestHandler can stream HLS files too. Here listed necessary files to run HLS streaming server with Python:
- index.html
-
Use hls.js to play HLS Stream. There is extra HLS configs:
var config = Hls.DefaultConfig; config.liveSyncDurationCount = 1; config.startFragPrefetch = true; var hls = new Hls(config); - hls.js
- HLS Stream player written in JavaScript for web
- server.py
- This implements a simple HTTP Request Handler based on
SimpleHTTPRequestHandler - run.sh
- This script creates a temporary folder in shared memory to store video segments.
Then it runs
ffmpegto read camera and write video chunks. Finally, it calls server.py to serve the web.
Use ffmpeg to generate both HLS and DASH segments, with some options to reduce latency.
ffmpeg -y \
    -input_format h264 \
    -f video4linux2 \
    -framerate 25 \
    -use_wallclock_as_timestamps 1 \
    -i /dev/video0 \
    -c:v copy \
    -f dash \
    -ldash 1 \
    -seg_duration 1 \
    -frag_duration 1 \
    -streaming 1 \
    -window_size 30 -remove_at_exit 1 \
    -strict experimental -lhls 1 \
    -hls_playlist 1 -hls_master_name live.m3u8 \
    -utc_timing_url https://time.akamai.com/?iso \
    -write_prft 1 \
    -target_latency 1 \
    /dev/shm/hls/live.mpd &
The result is not good as expected, as there is still about 3.3 seconds of delay in a LAN.
Some lines of code to handle exception are also needed, for full source code, please download by clicking on the download button at the beginning of this post.
Can NOT bind to port numbers lower than 1024
Port numbers lower than 1024 are for privileged user only.
Therefore:
- Use a port number larger than 1024 (recommended)
- Or run the script as a privileged user
Harder, but more secure solution if it’s really necessary to accept from port numbers lower than 1024:
- Run the as unprivileged on a higher port, and forward that port to lower port externally.